
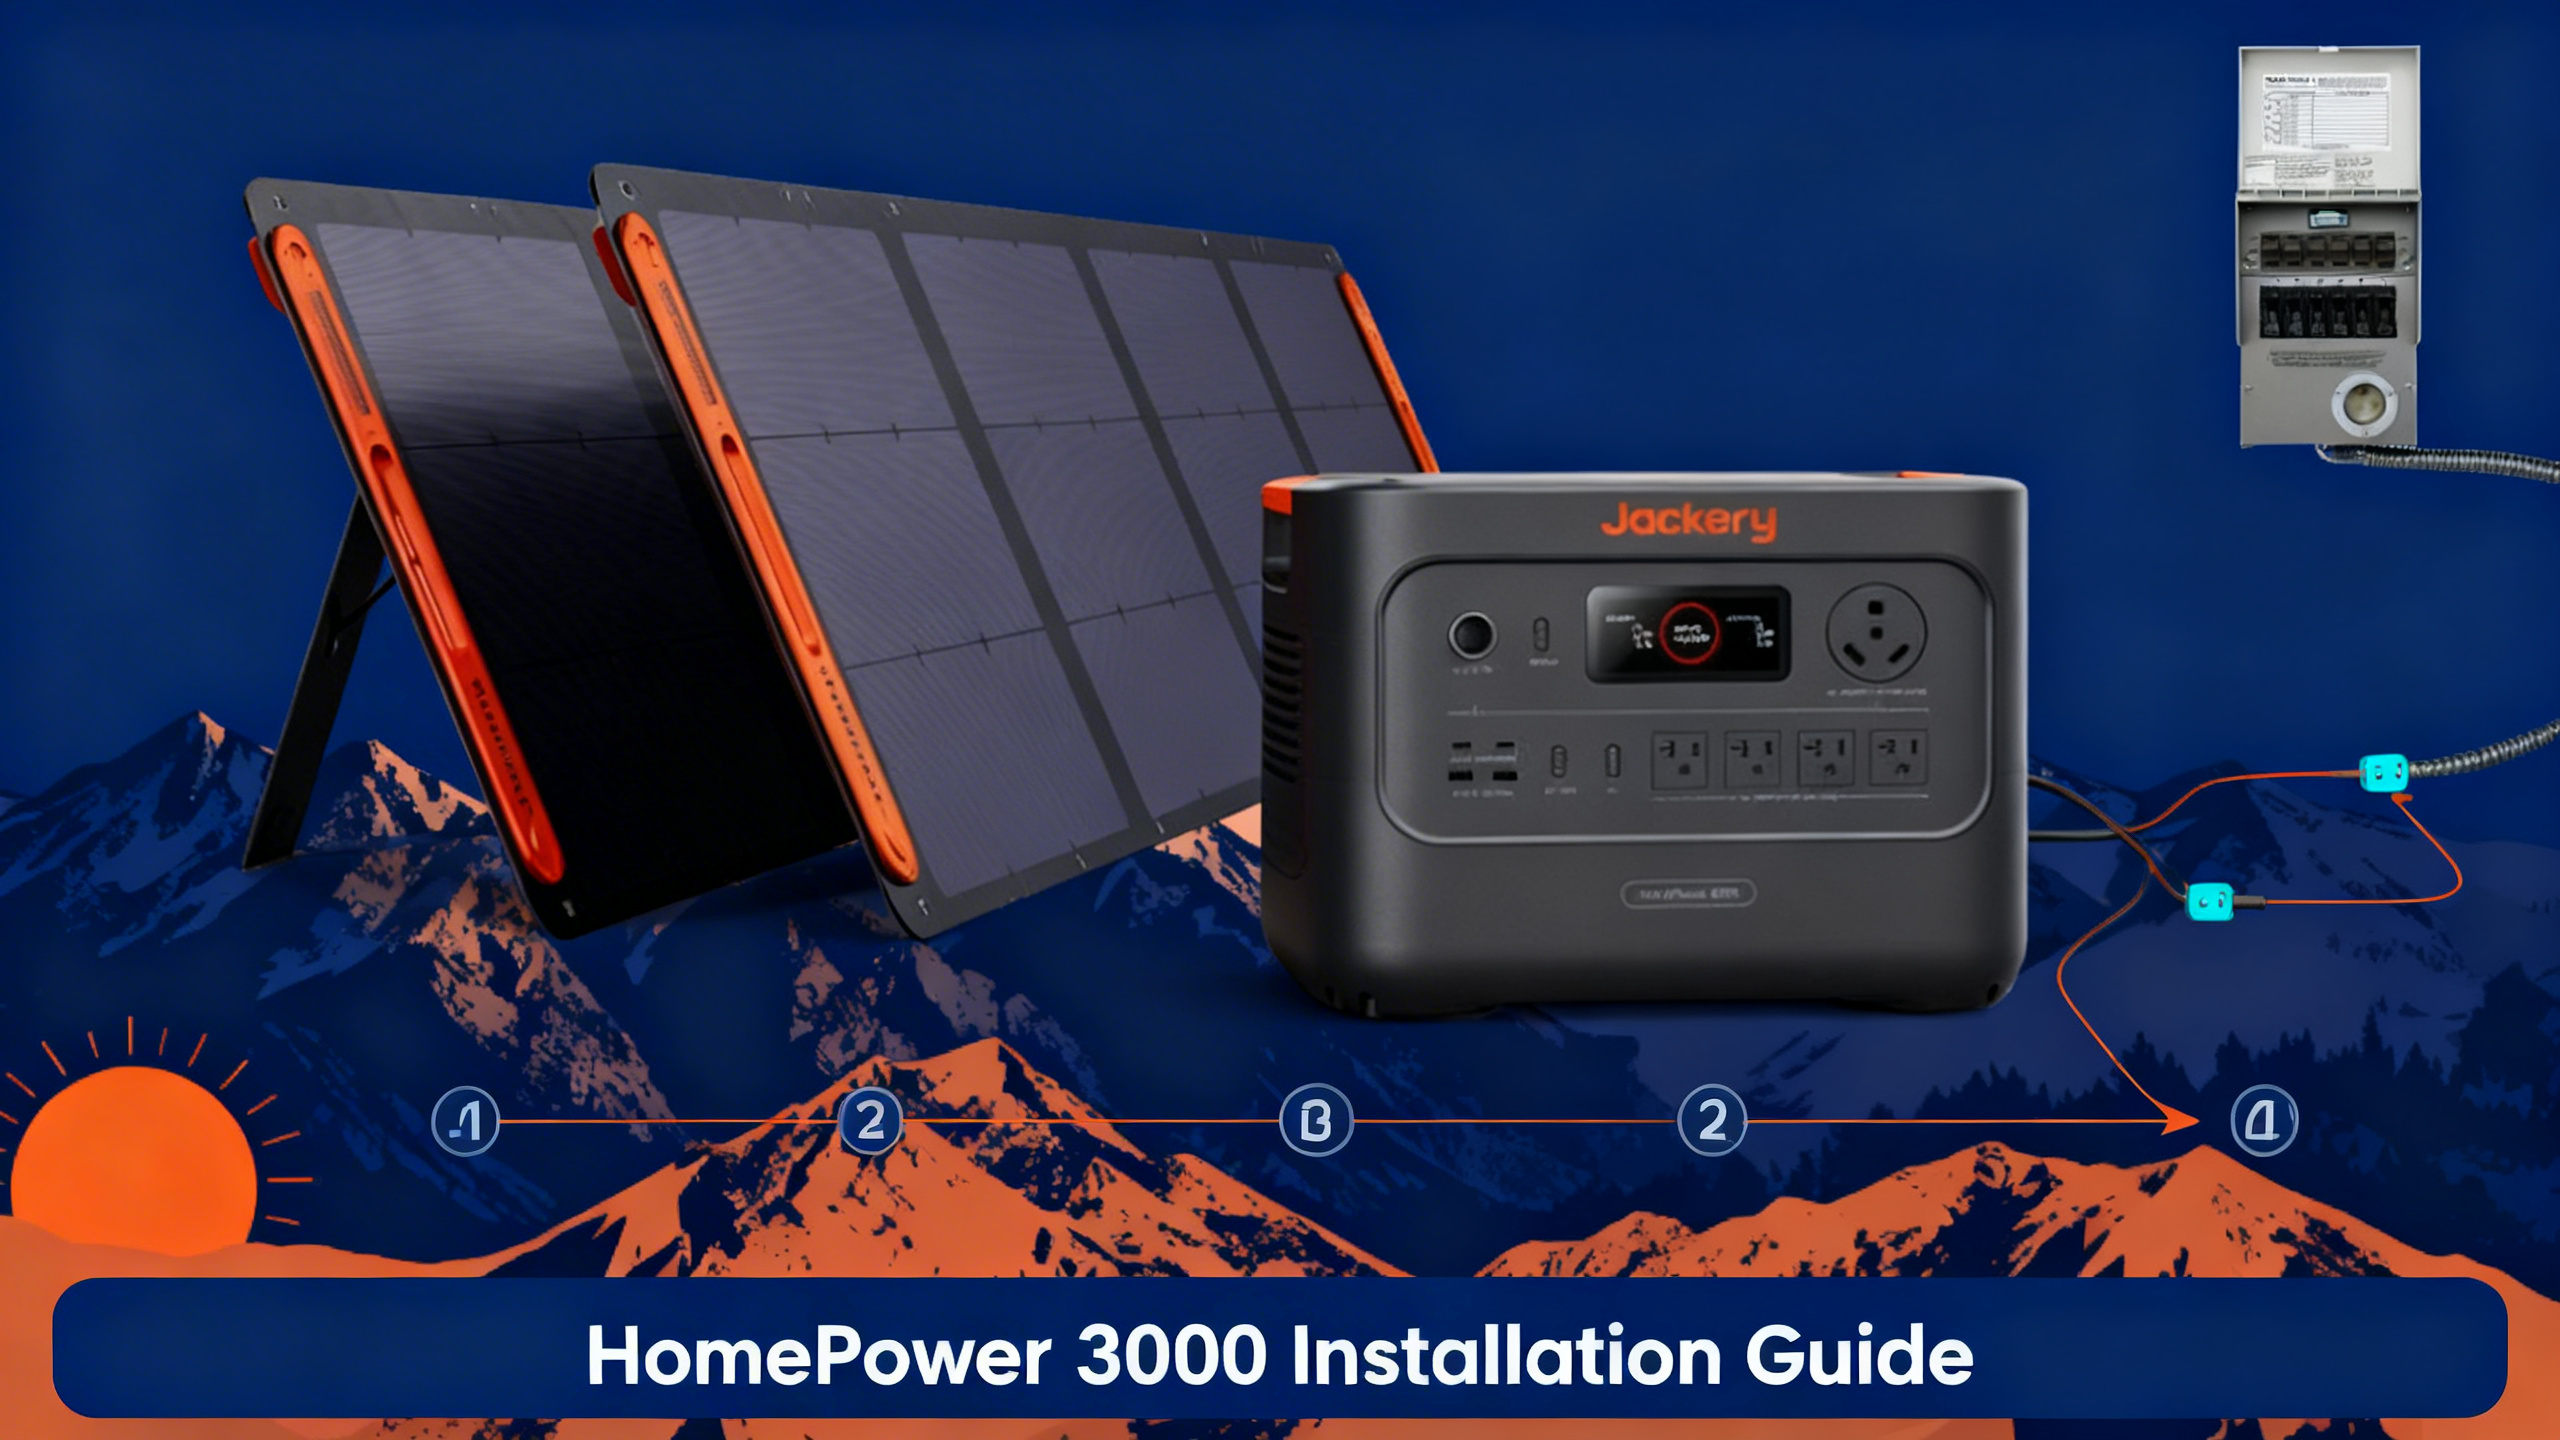
Worried about the next power outage knocking out your fridge, router, and lights? The official HomePower 3000 product page positions this unit as a complete home backup solution, and the specs back that up: 3,072Wh of LiFePO4 capacity, 3,600W continuous output, and compatibility with a manual transfer switch for circuit-level integration. The good news is that basic Jackery HomePower 3000 setup takes under an hour, and adding a transfer switch for home backup is well within reach for most homeowners.
This guide walks you through all five steps: choosing your placement location, running the initial power-on check, configuring your charging method, connecting the transfer switch, and verifying everything works before an actual outage. Whether you're starting with the station standalone or going straight to full circuit integration, here's exactly what to do.

Jackery HomePower 3000
$2,499
- 3,072Wh LFP battery, 3,600W output (7,200W surge)
- Recharges in 1.7 hours via wall or hybrid
- Manual transfer switch compatible for home circuit integration
What You'll Need
Required Equipment
Before starting, check the HomePower 3000 specifications to confirm output ratings match your circuit requirements. Here's the full equipment list for a complete home backup install:
- Jackery HomePower 3000 ($2,499): the core unit with 3,072Wh LFP capacity and 3,600W output
- Jackery Manual Transfer Switch (~$400, sold separately): required for home circuit integration
- Heavy-duty extension cord (14 AWG minimum, 25 ft): for connecting to wall outlet during charging
- Flathead and Phillips screwdrivers: for transfer switch panel mounting
- Non-contact voltage tester: a safety essential before any panel work
- Optional: Jackery SolarSaga 200W panels (x2): for solar backup charging capability
Estimated Time and Difficulty
Station-only setup (no transfer switch) takes 30-60 minutes and requires no technical background. Adding the Jackery manual transfer switch for home circuit integration bumps the job to 2-3 hours and intermediate difficulty. The panel-side wiring requires proximity to live electrical circuits: if you're not comfortable near your breaker box, plan to have a licensed electrician handle that portion.
| Equipment | Purpose | Est. Cost |
|---|---|---|
| HomePower 3000 | Primary power source | $2,499 |
| Manual Transfer Switch | Circuit integration | ~$400 |
| 14 AWG Extension Cord | Wall charging run | $20-40 |
| Voltage Tester | Safety verification | $15-30 |
| SolarSaga 200W (x2) | Solar backup charging | Optional |
Before You Start: Safety and Preparation
5 Safety Precautions
Don't skip this section. Working near your electrical panel carries real risk, and the HomePower 3000's 3,600W output is enough to cause serious injury if proper steps aren't followed.
1. Never place the HomePower 3000 near gas lines or in enclosed spaces. LiFePO4 (LFP) batteries are significantly more thermally stable than standard lithium-ion, but they still require ventilation. Maintain at least 6 inches of clearance on all sides during operation.
2. Turn off your main breaker before any transfer switch work. Confirm with your non-contact voltage tester before touching any wiring. Verified installation requirements per NEC electrical safety standards make this step non-negotiable.
⚠️ Important: Never assume the breaker is off based on visual inspection alone. Always verify with a voltage tester before handling any panel wiring.
3. Read the HomePower 3000 user manual before powering on. ZeroDrain mode settings affect standby power draw and should be configured before placing the unit in long-term backup standby.
4. Use the correct cable gauge. 14 AWG handles runs under 25 ft adequately; upgrade to 12 AWG for 25-50 ft runs to avoid voltage drop and heat buildup in the cord.
5. Do not expose the unit to rain or moisture during setup. The HomePower 3000 is not waterproof-rated. Garage or utility room installation is recommended over outdoor placement.
For a broader overview of sizing and budgeting, the complete guide to home backup planning covers load calculations and circuit selection before you commit to a transfer switch configuration.
Jackery HomePower 3000: Key Specifications
| Specification | HomePower 3000 |
|---|---|
| Battery Capacity | 3,072 Wh (LFP) |
| AC Output | 3,600W (7,200W surge) |
| Battery Type | LiFePO4 (LFP) |
| Recharge Time (Wall) | As fast as 1.7 hours |
| ZeroDrain Retention | 95% after 1 year storage |
| Charging Inputs | Wall / Solar / Car / Hybrid / Gas |
| Transfer Switch Compatible | Yes (manual transfer switch) |
| Warranty | 5 years |
Step 1: Choose Your Placement Location
Indoor Placement Criteria
Placement isn't just a convenience decision. It determines how easily the HomePower 3000 integrates with your electrical panel and how quickly you can reach it during an outage. Keep these four requirements in mind:
- Within 25 ft of the main electrical panel (necessary for transfer switch cable reach)
- Away from direct sunlight, moisture, and temperature extremes
- On a flat, stable surface (the unit weighs approximately 68 lbs per published data)
- Near a standard 120V wall outlet for charging access
Positioning Tips
A utility room, garage, or finished basement hits all four requirements in most homes. Avoid living areas: the inverter produces low operational noise during active discharge that becomes noticeable in quiet spaces. You'll also want easy visual access to the LCD display for monitoring charge level and output wattage during an outage.
You'll know the location is correct when the unit sits within reach of both the electrical panel and a 120V wall outlet without requiring extension cords longer than 25 ft.
Step 2: Initial Power-On and Baseline Check
First Power-On Sequence
Before connecting anything to your home circuits, confirm the unit is functioning correctly on its own. This baseline check takes under 5 minutes and rules out any transit damage or charging issues before they become a problem during an outage.
- Verify the charge level on the LCD display: aim for 80-100% before first use
- Press the AC output button to confirm the 3,600W capacity registers on screen
- Connect a test device (a lamp or small appliance) to verify AC output is live
- Check the DC and USB ports independently to confirm all output channels are active
Understanding the Display
The LCD shows input watts, output watts, charge percentage, and estimated runtime simultaneously. Charge level below 20% means you should recharge before continuing with the installation. Published spec data confirms the unit accepts wall input for full recharge in approximately 1.7 hours at full rated input.
You'll know the baseline check is complete when the LCD displays a charge percentage above 80% and “AC ON” with no error codes shown.
Step 3: Configure Your Charging Setup
Option A: Wall Outlet Charging (Standard)
Wall charging is the fastest and simplest method. Plug the included AC charging cable into any standard 120V outlet. Charge time data based on published specifications confirms 0-100% in approximately 1.7 hours at full wall input. A dedicated 15A or 20A circuit is recommended if available, though a shared circuit works for routine standby maintenance charging.
If the HomePower 3000 exceeds your budget, the roundup of the best Jackery for home backup covers more affordable alternatives at lower capacity points.
Pro Tip: Standby Charging Strategy
Keep the unit at 80% charge for long-term standby rather than 100%. ZeroDrain technology retains 95% of charge over a full year, so a quick top-up before storm season is all that's needed.
Option B: Solar Panel Integration
For off-grid recharging during extended outages, connect Jackery SolarSaga 200W panels (minimum two) via the DC solar input. Solar charging data based on published specifications indicates approximately 8-10 hours to full charge under ideal peak irradiance conditions. Point panels south at a 30-45 degree tilt for maximum efficiency. Hybrid mode (wall plus solar simultaneously) accelerates charge time when grid power is partially available.
Option C: Gas Generator Pairing
When the grid is down and solar isn't available, a gas generator provides an emergency recharge path. Verified charging data indicates a generator rated at 3,500W or higher is needed to hit full charging speed via AC input. This option works as a last resort but introduces generator noise and fuel logistics into your backup plan.
HomePower 3000 Charging Methods
⚡ Wall Outlet
Time: ~1.7 hours
Fastest method. Standard 120V household outlet.
☀️ Solar (2x200W)
Time: ~8-10 hours
Off-grid option. Two SolarSaga 200W panels recommended.
🔁 Hybrid
Time: Faster than solar alone
Wall + solar simultaneously for maximum speed.
🚗 Car / Gas
Time: Variable
Emergency backup options. Car 12V DC or gas generator input.
Step 4: Transfer Switch Installation for Home Circuit Integration
What the Transfer Switch Does
Without a transfer switch, the HomePower 3000 operates as a standalone station: appliances plug directly into its output ports. That works fine for a few devices, but it's not practical for running your fridge, router, and lights simultaneously through your existing wall outlets. The transfer switch solves that by routing HomePower 3000 power through specific home circuits during an outage, so your normal wall outlets keep working.
According to Jackery's official documentation, the HomePower 3000 is compatible with the Jackery Manual Transfer Switch (~$399). A 10-circuit manual transfer switch typically supports 8-10 selected home circuits, which covers all essential loads for most households.
Transfer Switch vs. Standalone Operation
The transfer switch is optional for basic backup use. If you only need to power a fridge, laptop, and router directly, you can plug them straight into the HomePower 3000's AC ports and skip the transfer switch entirely.
Pre-Installation Requirements
The HomePower 3000 connects to the transfer switch via its standard AC output cable, which is a simple plug-in connection. The panel side is a different matter. Running 10/3 cable from each selected circuit to the transfer switch panel requires proximity to your main electrical panel with the breaker off.
Transfer switch installation near an electrical panel requires a licensed electrician in most jurisdictions. The HomePower 3000 side of the connection is straightforward enough for most homeowners. The breaker box side is where most people bring in a professional.
The 4-Step Connection Process
- Mount the transfer switch panel adjacent to the main electrical panel (installer or electrician task)
- Run 10/3 cable from each selected home circuit to the transfer switch (installer task with breaker off)
- Connect the HomePower 3000 AC output cable to the transfer switch input port (homeowner task)
- Test by toggling individual circuit switches to confirm power routes correctly to each circuit
You'll know the transfer switch is correctly connected when toggling a circuit switch while the HomePower 3000 is active immediately restores power to that circuit. The LCD output wattage will increase proportionally to the load on that circuit.
Step 5: Verification, Testing and Outage Simulation
3-Step Verification Sequence
Don't wait for an actual outage to find out if the setup works. A 10-minute simulation now prevents a stressful discovery during a real emergency.
- Disconnect the main breaker to simulate an outage
- Toggle the transfer switch circuits to HomePower 3000 power, one at a time
- Verify each connected appliance (fridge, router, lights) comes back online
Expected Results
| Test | Expected Result | If Not Working |
|---|---|---|
| Fridge powers on | LCD shows 100-200W output increase | Check circuit toggle on transfer switch |
| Router stays live | Internet connection maintained | Verify DC/USB output is active |
| LCD runtime estimate | Proportional to load (lower watts = longer) | Check charge level: recharge if below 20% |
What Can It Power? (Runtime Data)
Runtime calculations based on the 3,072Wh capacity at approximately 85% efficiency show the HomePower 3000 handles essential home loads comfortably for 1-2 days. Here's how specific appliances stack up:
What Can the HomePower 3000 Power? (3,072Wh)
🍔
Refrigerator
~48 hrs
~60W avg
💡
LED Lights (10x10W)
~30 hrs
100W total
📡
Wi-Fi Router
~200 hrs
~15W
🌬️
Ceiling Fan
~60 hrs
~50W
☕
Coffee Maker
~15 cycles
~200W
💻
Laptop
~50 charges
~60W
Runtime calculations based on 3,072Wh capacity at ~85% efficiency. Mixed loads will reduce total runtime.
Running a combined load of fridge (60W), router (15W), and 5 LED lights (50W) draws roughly 125W total. At that rate, performance data indicates approximately 20+ hours of continuous runtime before reaching the 20% recharge threshold. The 3,600W surge capacity handles refrigerator compressor startup at up to 1,500W without issue.
Troubleshooting: 5 Common Issues
| Problem | Likely Cause | Solution |
|---|---|---|
| Unit won't turn on | Charge too low, or button held incorrectly | Hold power button 2 seconds; charge to 20%+ first |
| AC output not activating | AC button not pressed after power-on | Press AC button separately: it's not auto-on |
| Low charge despite wall input | Cable connection loose | Re-seat AC charging cable at both ends |
| Fridge not running on AC | AC output button not active | Fridge surge can hit 1,500W: confirm AC output is on, 3,600W handles this comfortably |
| Transfer switch circuit not responding | Wrong circuit selected or switch in wrong position | Toggle each circuit individually; consult transfer switch manual |
Pro Tips for Long-Term Reliability
- Keep charge between 20-80% during long-term standby (ZeroDrain retains 95% over one year even at full charge, so seasonal top-ups are sufficient)
- Recharge fully every 3 months if kept in standby mode as an additional safeguard
- Clean input and output ports annually with compressed air to prevent oxidation
- Test the transfer switch manually twice per year, particularly before storm season
- Store in a temperature-controlled environment between 32-104°F (0-40°C) for optimal LFP longevity
What to Do Next
With setup complete, here are the logical next steps for your home backup system:
- Review the full HomePower 3000 specifications for a detailed breakdown of all output ports and advanced features
- For sizing and multi-circuit planning, the guide to home backup planning covers load calculations and circuit prioritization
- If the HomePower 3000 is over budget, browse the best Jackery for home backup for lower-capacity options
- Explore the full 2026 generation for other home backup options across Jackery's newest lineup
Jackery HomePower 3000
$2,499
Best Jackery for whole-home circuit backup
Price verified April 2026. Free shipping available
Frequently Asked Questions
Does the Jackery HomePower 3000 require a transfer switch to use as home backup?
No. The transfer switch is optional but highly recommended for seamless circuit integration. Without it, the HomePower 3000 operates as a standalone station: appliances must be plugged directly into its output ports. The transfer switch allows power to flow through your existing wall outlets during an outage, which is far more practical for running a full set of essential circuits. For light use (fridge, laptop, router plugged directly), a standalone setup works without any additional hardware.
Can I install the Jackery manual transfer switch myself?
The HomePower 3000 side of the connection is a straightforward plug-in that most homeowners can handle independently. The panel side is different: running 10/3 cable from each selected circuit to the transfer switch involves working near your main electrical panel with live components nearby. Jackery's documentation recommends hiring a licensed electrician for the panel-side wiring. In most jurisdictions, pulling permits for panel work is also required. Many homeowners split the job: electrician handles the panel, homeowner handles the power station connection.
How long does the Jackery HomePower 3000 last on a full charge during an outage?
Runtime calculations based on the 3,072Wh capacity at approximately 85% efficiency indicate around 2 days powering essential loads: a refrigerator (~60W average), Wi-Fi router (~15W), and LED lighting (~50W combined). That's roughly 125W combined, yielding 20+ hours before hitting the 20% recharge threshold. High-draw appliances like electric water heaters, HVAC systems, or electric stoves will significantly reduce runtime. The Jackery power station runtime calculator can give you a load-specific estimate based on your actual appliances.
What is ZeroDrain technology and does it matter for home backup?
ZeroDrain is Jackery's proprietary standby power management system. Published data indicates the HomePower 3000 retains 95% of its stored charge after one year of storage. For home backup applications, this is a significant practical benefit: a unit kept fully charged in standby through spring and summer will still have near-full capacity available when hurricane season or winter storms arrive. You don't need monthly recharge cycles to maintain readiness. A full charge before storm season, plus an annual check, is sufficient maintenance.
Can I charge the HomePower 3000 with solar panels during an outage?
Yes. The HomePower 3000 accepts solar input via its DC charging port during active use or standby. Two Jackery SolarSaga 200W panels provide approximately 8-10 hours to full charge under ideal peak irradiance conditions. For extended outages, published data indicates adding two SolarSaga 200W panels generates up to 3,500kWh of clean energy over five years. Hybrid mode (wall plus solar simultaneously) is faster but requires partial grid availability for the wall component.
What's the difference between the HomePower 3000 and the Explorer 3000 v2?
Both units offer similar LFP capacity near 3,072Wh, but they target different use cases. The HomePower 3000 is purpose-designed for stationary home backup: Jackery positions it as “the world's smallest 3kWh LFP generator” with home circuit integration (transfer switch compatibility) as a core feature. The Explorer 3000 v2 is the portable and outdoor-oriented successor to the 3000 Pro, built for mobility rather than permanent household installation. If your primary goal is home backup with circuit integration, the HomePower 3000 is the right choice. A detailed spec comparison is available in the dedicated HomePower 3000 vs Explorer 3000 v2 article.
Originally published: April 15, 2026