
Want to run the Anker SOLIX C800X entirely on solar? The spec sheet promises up to 300W of solar input, but the right panel choice is what turns that number into a practical charging strategy. The wrong combination leaves you waiting 10+ hours for a full charge. The right one gets you back to 100% in under 3 hours.
This guide covers five panel configurations, from the $155 budget option to the dual-panel setup that maxes out the C800X's MPPT controller. For a complete analysis of the station's performance and build quality, the C800X detailed review covers every spec in depth. Here, the focus is entirely on solar pairing.

By the end of this guide, you'll know the exact panel setup for your situation, including wiring configs, estimated charge times by location, and the one combination that delivers the best balance of speed and cost.
Anker SOLIX C800X: 768Wh | 1200W
$379.00
- 300W max solar input, fills 768Wh in ~3h
- HyperFast wall charge: 100% in 58 minutes
- LFP battery: 3,000 cycles, 10-year lifespan
Understanding the C800X Solar Input: What 300W Actually Means
The C800X accepts up to 300W of solar input through its built-in MPPT controller (Maximum Power Point Tracker, the component that optimizes conversion from your panels to the battery). That 300W ceiling is a hard limit enforced by the hardware, not a guideline.
What this means in practice: connecting a 400W panel doesn't damage the station, but the controller caps intake at 300W. Any panel capacity above that threshold goes unused. The C800X accepts solar voltage in the 10-50V range via a standard XT60 connector, which all Anker SOLIX panels are factory-wired to match.
C800X Solar Specs at a Glance
Source: official C800X specifications
What You'll Need: Equipment and Materials
Setting up the C800X for solar charging takes 15 to 30 minutes for the first run. Once you've done it once, reconnecting at each campsite takes under 2 minutes. Here's what you need before starting.
Required equipment:
- Anker SOLIX C800X portable power station ($379.00)
- Compatible Anker SOLIX solar panel (PS100, PS200, or 625, see section below)
- MC4-to-XT60 solar cable (included with all Anker SOLIX panels)
- MC4 parallel Y-adapter if using two panels (required for 2x PS200 setup)
Optional but useful:
- MC4 extension cable (33ft, SKU A24U2011, $59.99) for longer cable runs between station and panel
- Multimeter to verify panel output voltage before first connection
- Cable ties and waterproof MC4 connector caps for permanent RV or van installations
⚠️ Common mistake: Connecting the MC4 cable to the station while the C800X is powered on. Best practice is to connect the solar cable first, then power on the station. This prevents any transient voltage spikes during connection.
Which Panel Is Right for the C800X? The 5 Options Compared
This section is the core of the guide. The C800X is compatible with the full Anker SOLIX portable panel lineup, each representing a different trade-off between cost, weight, and charging speed. Here's how each option performs.
Budget Pick: Anker SOLIX 625 Portable Solar Panel (100W, $155)
The 625 is the entry point for solar charging the C800X. At $155, it's the most affordable compatible option, and spec analysis confirms it delivers around 75–85W of real-world output under typical outdoor conditions (roughly 80% of nameplate rating, standard for consumer solar panels). For occasional camping trips where you're refilling the C800X overnight, this setup works. Charge time data puts a full charge at approximately 9 to 10 hours in good sun, which means you're relying on an entire day of peak exposure. If you need the station recharged in a single afternoon, this setup falls short.
Standard Choice: Anker SOLIX PS100 (100W, $299)
The Anker SOLIX PS100 steps up to higher cell efficiency and a four-position adjustable stand compared to the 625's more basic design. Real-world input data points to around 85–95W output, shaving 30 to 60 minutes off the 625's charge time. At $299 versus $155, the efficiency gain is incremental for a 100W-class panel. The PS100 makes sense if you prioritize build quality and panel durability over raw cost savings.
Sweet Spot: Anker SOLIX PS200 (200W, $499)
This is where the math changes meaningfully. A single PS200 doubles the wattage over the 100W options, and efficiency data shows real-world input averaging around 160–180W. That translates to a full C800X charge in approximately 4.5 to 5 hours, compared to 8 to 10 hours with a 100W panel. For weekend camping or van life use where you want reliable same-day recharging, the PS200 hits the right balance. It's one panel, one cable, and it covers 60% of the C800X's maximum solar capacity on its own.


★ Recommended configuration for max solar efficiency without overspending. The C800X's 300W input cap means 2x PS200 is the sweet spot.
Anker SOLIX Solar Panel Lineup 2026
Head-to-head comparison of every Anker SOLIX panel including rigid and compact options.
The Maximum Input Setup: 2x PS200 in Parallel
Two PS200 panels connected in parallel is the configuration that fully utilizes the C800X's 300W MPPT ceiling. Parallel wiring doubles the amperage while keeping voltage constant, which is exactly what portable MPPT controllers are designed to handle. Series wiring (which doubles voltage) is typically reserved for rigid rooftop setups with higher voltage MPPT ranges.
The connection is straightforward: a parallel MC4 Y-adapter splits one cable into two MC4 inputs, one for each PS200. From there, a single MC4-to-XT60 cable runs to the C800X's solar port. Spec-for-spec, this setup delivers 260 to 300W real-world input, pushing the station from 0 to full in roughly 2.5 to 3 hours under strong sun.

What about the PS400? At $899, a single PS400 panel is simpler (one panel, one cable) but produces 400W of raw output that the C800X caps at 300W. The extra 100W of panel capacity is permanently unused on this station. The 2x PS200 config at $998 delivers the same effective charge speed while keeping both panels useful if you ever upgrade to a larger station later. For anyone committed to the C800X long-term, 2x PS200 is the smarter investment.


Step-by-Step: Setting Up Your C800X Solar System
No technical background is required here. If you can plug in an extension cord, you can complete this setup. The entire process from unboxing to live solar input takes under 30 minutes.
Step 1: Position Your Solar Panel (5 minutes)
Orient the panel toward the south if you're in the northern hemisphere, or toward the north in the southern hemisphere. Tilt the panel at 30 to 45 degrees depending on the season (steeper in winter, flatter in summer). The single most important factor in panel output is shadow-free exposure across every cell.
You'll know the position is correct when: the entire panel surface is in direct sun with no shadow cast by trees, awnings, or the station itself. A partial shadow on even one cell can reduce output by 20 to 40% on a standard panel without bypass diodes.
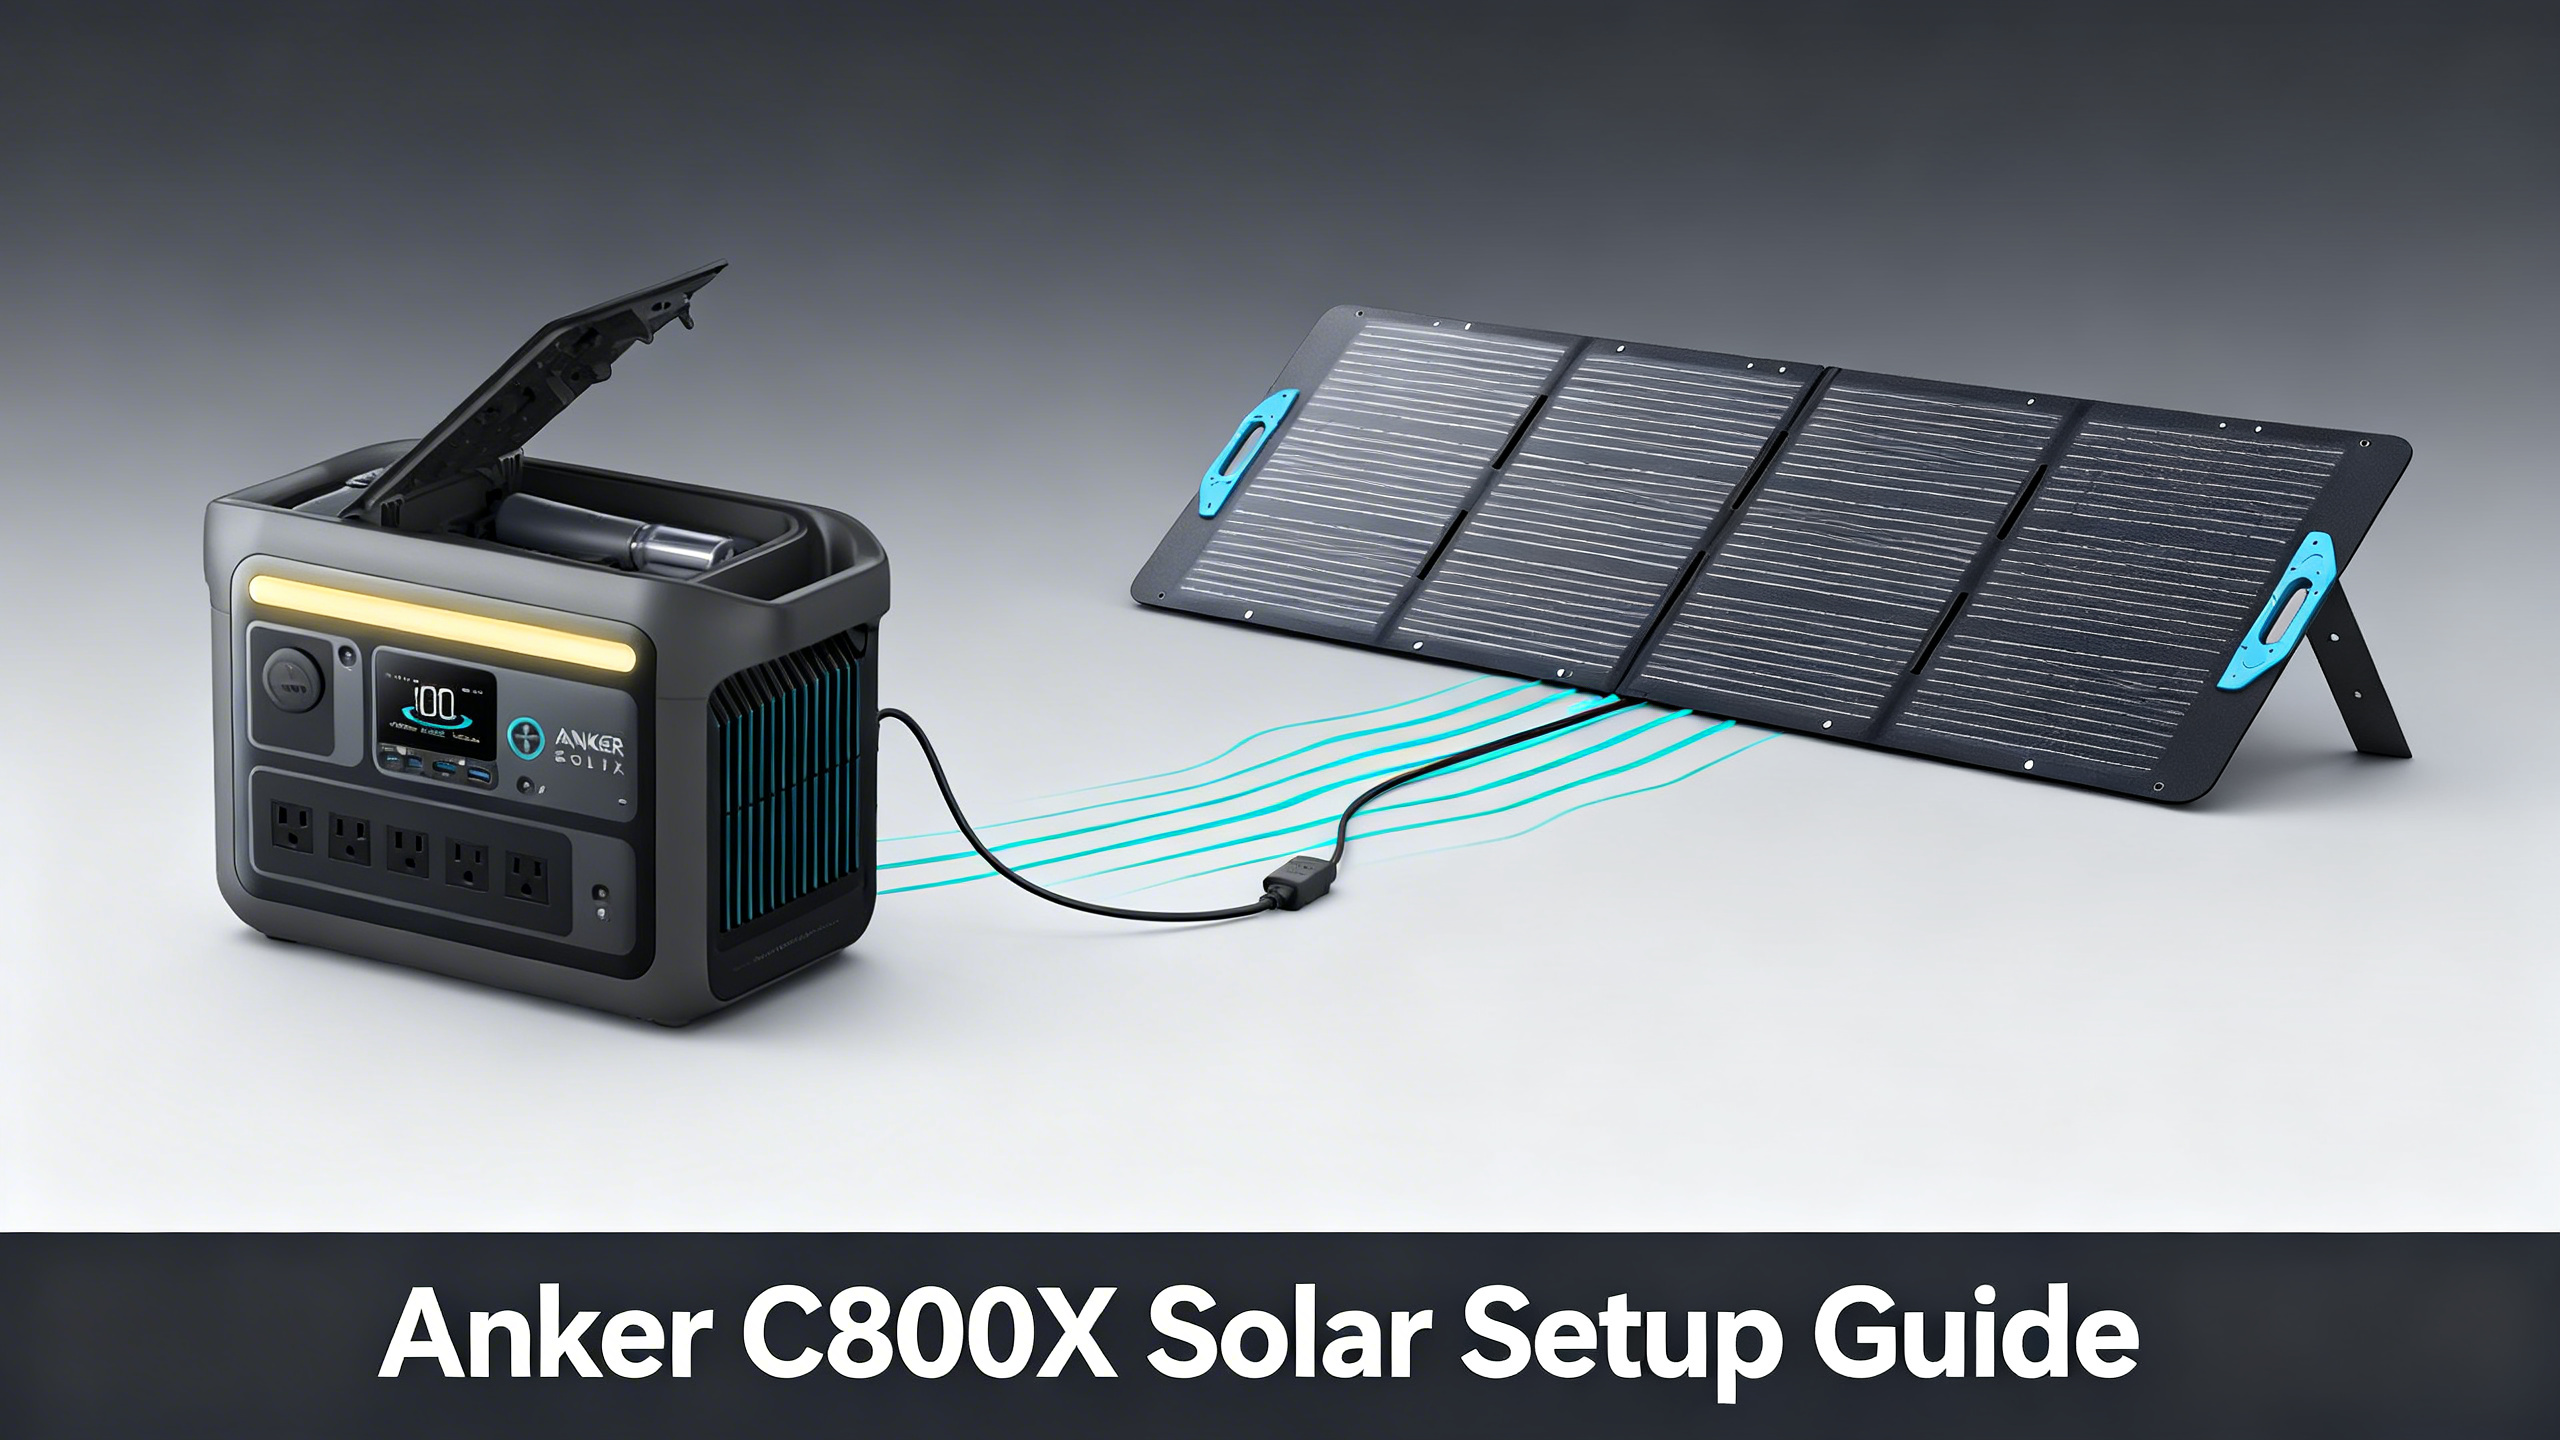
Step 2: Connect the MC4 Cable (2 minutes)
Attach the MC4-to-XT60 cable that came with your panel. MC4 (Multi-Contact 4mm) is the industry-standard weatherproof connector for solar panels, and the XT60 end plugs into the Solar Input port on the C800X. Push the MC4 connectors firmly together until you hear and feel a click. Don't force them: the connection is correct when it seats without resistance.
💡 Pro Tip: Connect the MC4 cable to the C800X before powering the station on. This ensures a stable connection sequence and avoids any display anomalies during the initial handshake between the panel and the MPPT controller.
Step 3: Verify Input on the C800X Display (2 minutes)
Power on the C800X. The LCD screen displays live solar input wattage in real time. A reading above 60W confirms the setup is functioning correctly under typical outdoor conditions. If the display shows 0W, check the MC4 connection first, then reposition the panel to eliminate any shadow sources.

Step 4: Monitor Charge Progress via the Anker App (optional)
The Anker app (iOS and Android) connects via Bluetooth or Wi-Fi and displays real-time solar input wattage, battery percentage, and an estimated time-to-full. It also lets you toggle outputs on and off remotely, which is useful if you're leaving the station to charge unattended at a campsite. The app is optional: the LCD screen gives you all the essential information without it.
Estimating Charge Times by Location
Published charge times assume “peak sun hours” (PSH), a measurement of how many hours per day your location receives sunlight equivalent to 1,000W per square meter. A location with 5 PSH doesn't mean 5 hours of direct sun: it means the cumulative energy received equals 5 full-intensity hours.
Phoenix, Arizona averages around 6 PSH annually. Seattle, Washington averages roughly 3.5 PSH. The same 1x PS200 setup that charges the C800X in 4.5 hours in Phoenix requires nearly 8 hours in Seattle. For precise local data, the solar irradiance calculator from the National Renewable Energy Laboratory gives location-specific peak sun hour estimates by ZIP code.
Estimated Solar Charge Times: Anker SOLIX C800X (768Wh, 300W max input)
☀️
1x PS100 (or 625)
~8–10h
80–100W real-world
⚡
1x PS200
~4–5h
~160–180W real-world
🔋
2x PS200 (max)
~2.5–3h
300W capped input
🌥️
2x PS200 (overcast)
~6–8h
30–50% efficiency loss
Estimates based on 768Wh capacity, 85% charge efficiency factor, and average peak sun hours (4–5h/day). Results vary by location and season.
Ready-Made Bundles vs. Custom Setups
If building a custom rig feels like too much, the solar kits overview lists every pre-configured C800X bundle available from Anker SOLIX. The most relevant ready-made option for most users is the C800X + 200W Solar Panel Bundle at $1,098.00.

Buying the bundle saves you the hassle of selecting compatible panels separately. The trade-off: you lose flexibility to choose your own panel wattage or mix configurations. For anyone certain they want a single PS200 setup from day one, the bundle simplifies the purchase. For anyone considering the 2x PS200 max configuration, buying separately and adding a second PS200 later is more cost-flexible.
Troubleshooting: Common Solar Setup Issues
Most C800X solar setup problems come down to one of four causes. Here's how to diagnose and fix each one.
Problem: Display shows 0W solar input. Cause: MC4 cable not fully seated, or panel in shade. Solution: Disconnect and reconnect the MC4 plug until you feel the click, then verify the entire panel surface is shadow-free. Even a small branch or awning edge across one cell can zero out the reading.
Problem: Input is much lower than expected (e.g., 40W from a 200W panel). Cause: Partial shading on one or more cells. Solution: Move the panel to an unobstructed location. Use the “shadow rule”: hold your hand at the panel edge and confirm no shadow falls across any part of the cell surface at the angle you're using.
Problem: Very slow charge despite clear skies. Cause: Panel voltage outside the MPPT's optimal range. Solution: Check that the panel's open-circuit voltage (Voc) is above 12V and within the 10-50V input spec of the C800X. Panels connected in a non-optimal configuration can produce voltage outside the MPPT's efficient tracking zone.
Problem: “Error” displayed at the solar port. Cause: Short circuit in the MC4 connection or reversed polarity. Solution: Power off the C800X completely, disconnect the MC4 cable, inspect both connectors for debris or damage, verify polarity (positive to positive, negative to negative), and reconnect with the station off before powering back on.
⚠️ Important: Panel output drops significantly under overcast skies. The guide on solar charging on cloudy days explains how to compensate with angle optimization and realistic charge time adjustments for variable weather conditions.
Is the C800X Solar Setup Right for You?
The C800X sits in a well-defined use case: mid-capacity portable power for users who camp, van life, or want outage backup at home. The 768Wh capacity and 300W solar input ceiling make it a capable but bounded tool. It's not a whole-home backup station, and it's not expandable with additional battery modules.
For a full head-to-head between every Anker SOLIX panel including the 440W rigid and 625 compact options, see the panel comparison guide.
✅ Start with the C800X solar setup if…
- You camp 1 to 3 nights and need to recharge a laptop, lights, and small fridge
- You want a van life or RV supplemental station under $600 all-in
- You need emergency home backup for phones, CPAP, and a fan during outages
- You want LFP durability without spending $1,000+ on a larger unit
❌ Look elsewhere if…
- You need to run a full-size refrigerator or AC unit (768Wh limits runtime significantly)
- You want whole-home backup for multiple days (the E10 is the right tool)
- You plan to expand with a battery module (C800X has no expansion port)
- You need more than 300W solar input: step up to the F3000 or C2000 Gen 2
Frequently Asked Questions
Can I use third-party solar panels with the Anker SOLIX C800X?
The C800X uses a standard XT60 solar input connector. Third-party panels with compatible voltage (12 to 50V range) and MC4-to-XT60 cables can work, but compatibility is not guaranteed. Anker's own panels are factory-tested for the MPPT controller and are the verified option. If you use a third-party panel, confirm the open-circuit voltage (Voc) is within the 10-50V input spec before connecting.
What happens if I connect a 400W panel to the C800X?
The C800X will cap solar input at 300W regardless of panel wattage. A PS400 panel will function correctly, but the extra 100W of panel capacity goes unused. Spec analysis confirms this is standard behavior for all portable stations with MPPT input limiters: no damage occurs, the controller simply throttles input to its rated ceiling. The station won't charge faster than it would with a 300W setup.
Can I charge the C800X with solar while using it at the same time?
Yes. Simultaneous solar input and AC/DC output is fully supported. Real-world data indicates that net charge rate depends on the balance between solar input and load draw. Running a 60W load while receiving 180W of solar input results in net positive charging at roughly 100W effective rate, extending the usable window of your station significantly compared to drawing from battery alone.
How many solar panels can I connect to the C800X?
The C800X has a single solar input port, so a parallel MC4 Y-adapter is required to connect two panels. Two PS200 panels wired in parallel is the maximum practical setup, hitting the 300W input ceiling. Connecting three panels would push wattage beyond 300W, with the excess capped by the MPPT controller. Two panels is the practical limit for this station.
Does the Anker SOLIX 625 work with the C800X?
Yes. Published compatibility data confirms the 625 panel works with the C800X via the included MC4-to-XT60 cable. At $155, it's the most affordable entry point for solar charging this station. Real-world output averages around 75 to 85W rather than the 100W nameplate rating under typical outdoor conditions, which puts a full charge at approximately 9 to 10 hours in good sun.
Setting Up the C800X Solar System: Final Verdict
The C800X's 300W solar ceiling is genuinely useful when you pair it with the right panels. For most users, a single PS200 delivers the best balance: fast enough for reliable same-day recharging, manageable in size and cost. For daily solar dependence, the 2x PS200 configuration is the investment that pays off, maxing out the station's input capacity without overspending on a 400W panel whose extra wattage goes unused.
The C800X fits into a broader ecosystem of portable and semi-permanent solutions: the full Anker SOLIX brand review maps the entire lineup if you're evaluating where the C800X sits relative to higher-capacity options.
Anker SOLIX C800X
$379.00
Best mid-range solar-ready station for camping and backup
Price verified April 2026. Free shipping available
Originally published: April 6, 2026