
Just bought the Jackery HomePower 3000 and not sure where to start? The jackery homepower 3000 setup process is mostly plug-and-play , but there's one part that trips people up: the transfer switch. This guide walks you through all six steps, from unboxing to whole-home circuit coverage.
Most of this setup takes under 30 minutes. The one exception: if you're connecting a manual transfer switch to your home's electrical panel, that step requires a licensed electrician. Everything else? You can handle it yourself, no technical background needed.
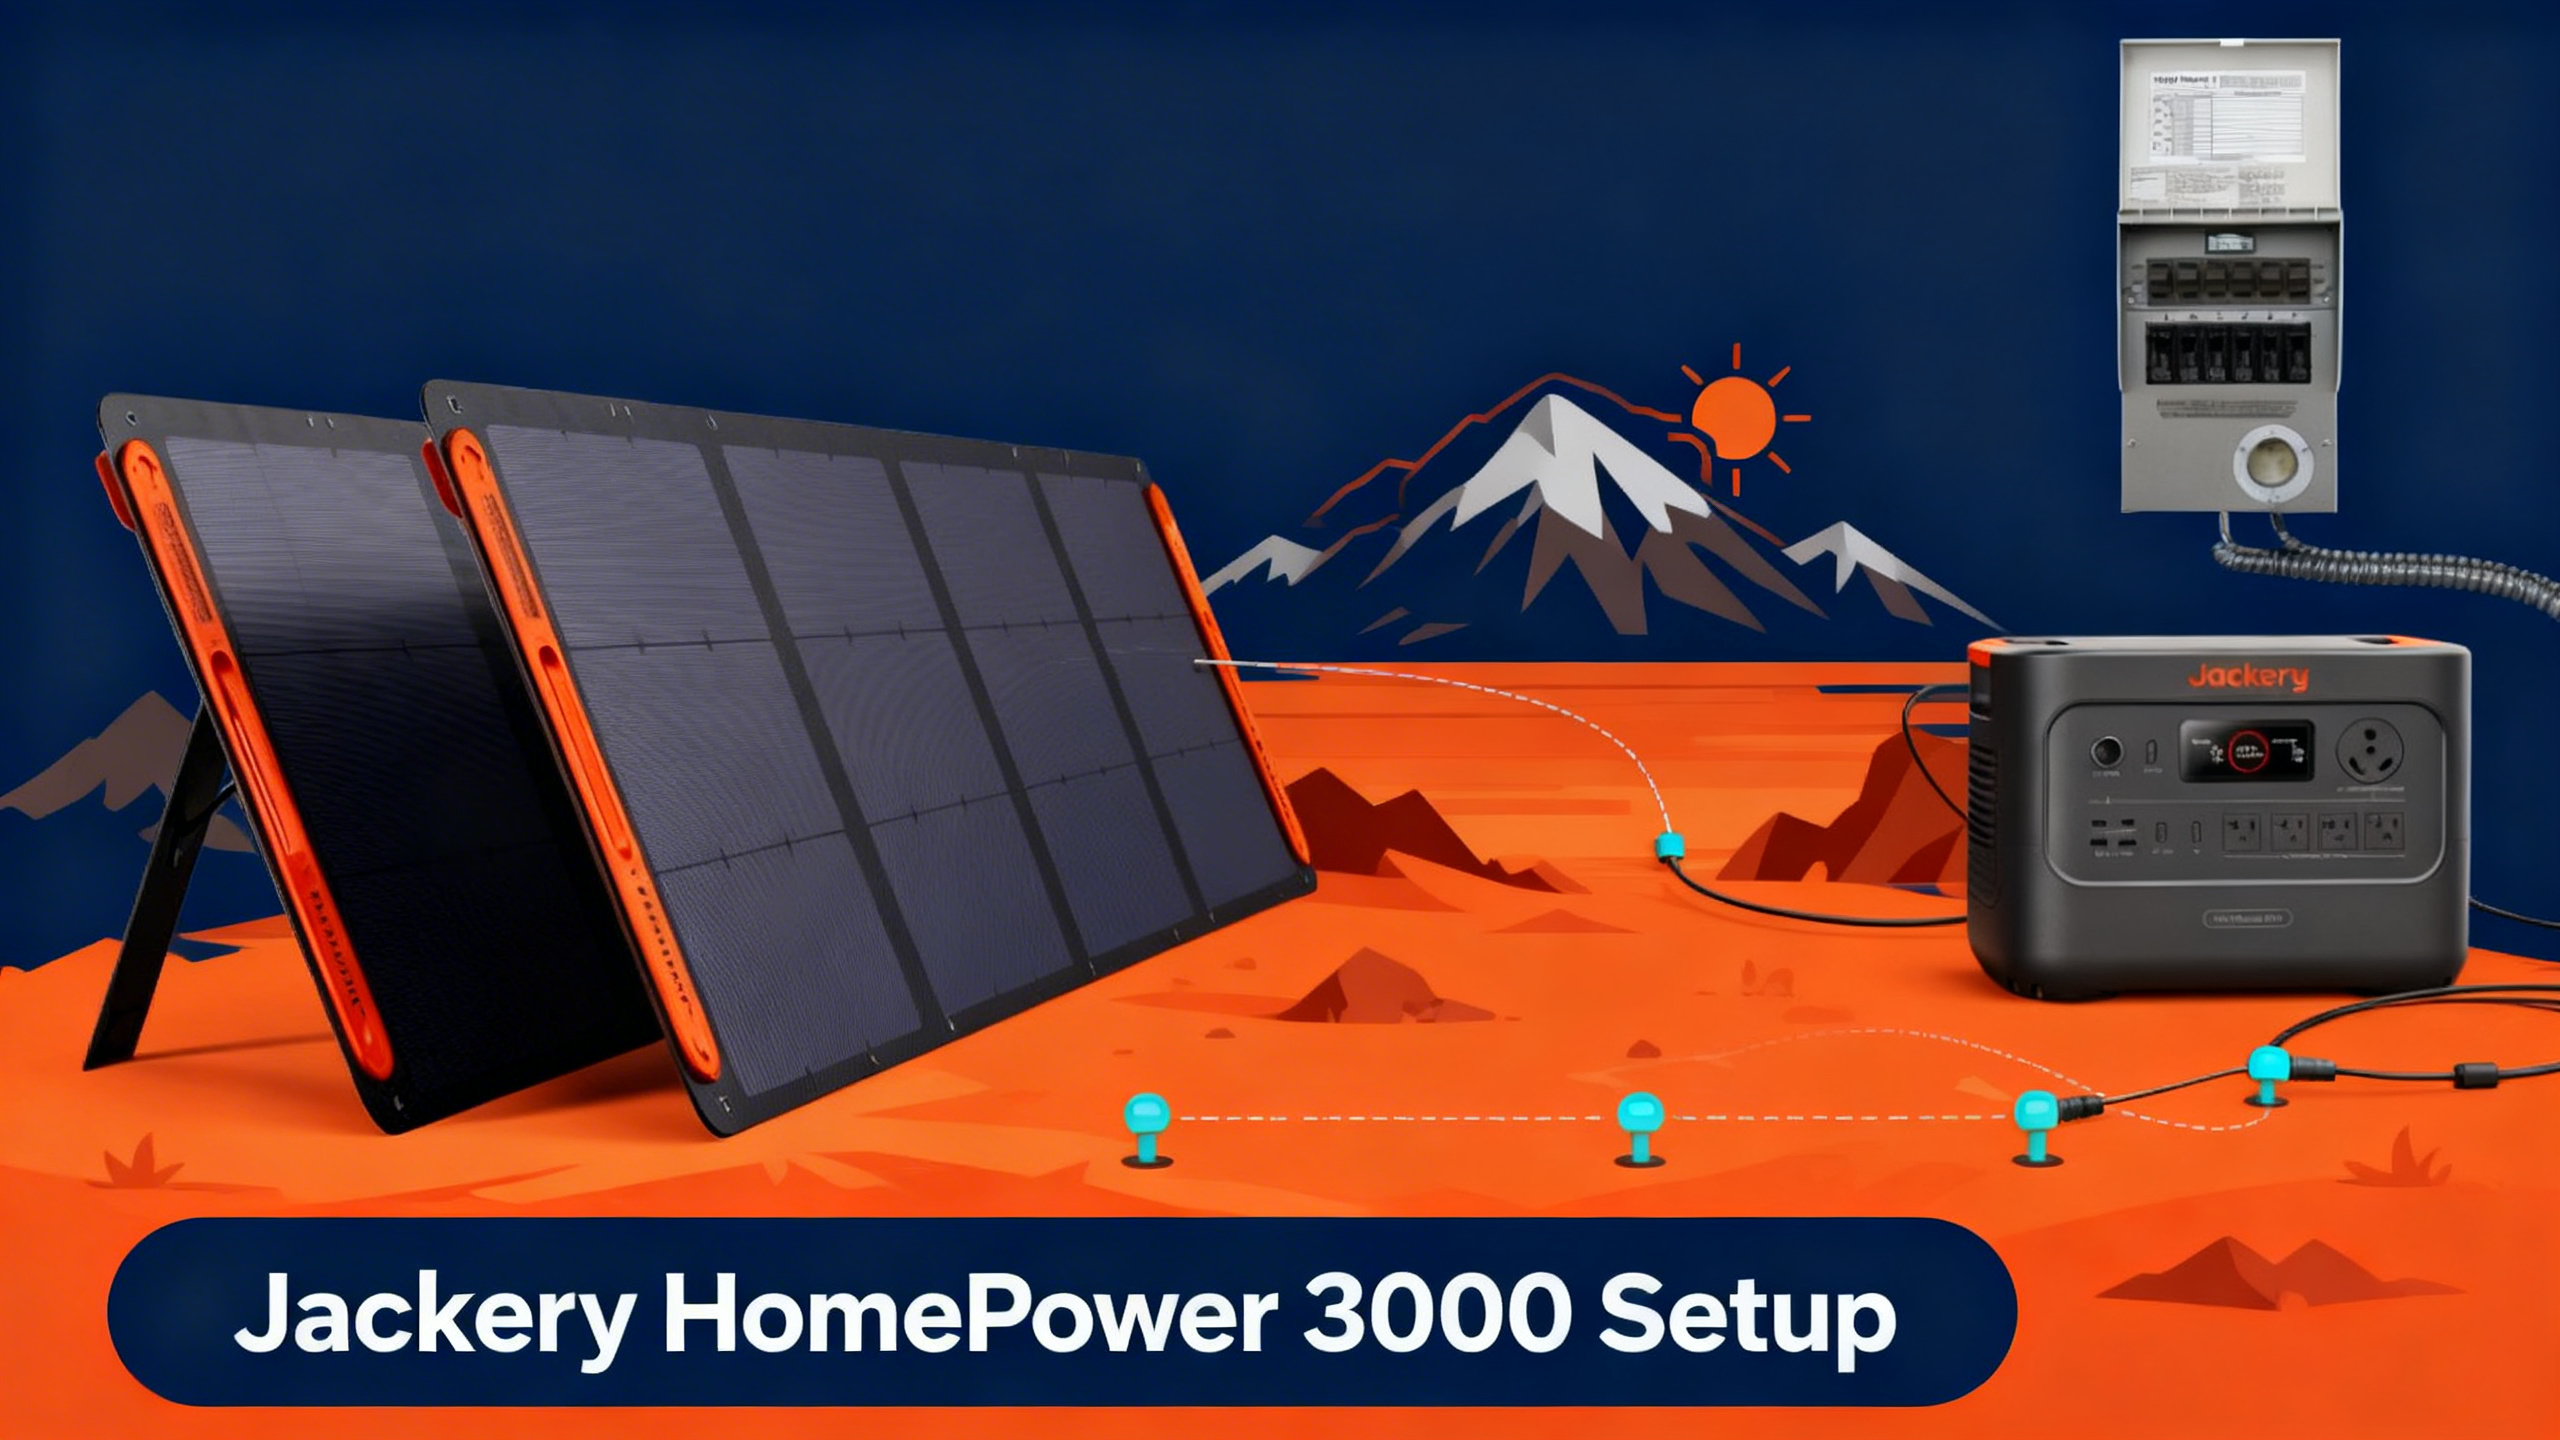
Here's what this guide covers: unboxing and initial charge, indoor placement, recharging strategies, direct device connections, transfer switch installation, and solar panel setup. Let's get started.

If you haven't yet decided which model to buy, our guide to the best Jackery for home backup covers all current options side by side.
Jackery HomePower 3000
$2,499
- 3,072Wh LFP battery , 10-year lifespan
- 3,600W output / 7,200W surge
- Full recharge in 1.7 hours via AC wall
What You'll Need: Equipment Checklist
Required Equipment
Before starting your Jackery HomePower 3000 setup, gather these items. Having everything on hand prevents interruptions mid-install.
- Jackery HomePower 3000 (3,072Wh, 3,600W output)
- AC wall outlet (standard 120V) for initial charge
- Extension cord, 14 AWG minimum , for running devices in other rooms
- Jackery Manual Transfer Switch (optional, ~$399, sold separately) , required for whole-home circuit coverage
For full specs and capacity breakdown, see our detailed HomePower 3000 specifications review before starting. You'll find output port diagrams and capacity data that help plan your load setup.
Optional Add-Ons
These aren't required for basic operation, but they extend what the HomePower 3000 can do during a prolonged outage.
- 2x Jackery SolarSaga 200W panels , for solar recharging during extended outages
- Multi-outlet power strip , to run multiple devices from a single AC port
- DC car charging cable , for emergency top-up via vehicle
- Anderson connector cable , for gas generator input
Estimated Time and Difficulty
Direct plug-in setup (no transfer switch): approximately 30 minutes, beginner level. Transfer switch installation: 2 to 4 hours total, including electrician visit. The plug-in portion is straightforward. The transfer switch wiring is where a professional becomes essential.
Before You Start: Safety Precautions
Safety Rules
Proper home backup planning starts with calculating your actual load needs before you touch a single cable. Beyond load planning, keep these four precautions in mind.
- Never open your home's electrical panel yourself. Transfer switch wiring connects to live circuits. This work requires a licensed electrician.
- Verify your outlet circuit capacity. The HomePower 3000 draws up to 1,800W while charging via AC. Make sure the circuit can handle the load without tripping.
- Use the unit in a ventilated space only. Do not operate in an enclosed space without airflow. Unlike gas generators, it produces no exhaust , but heat dissipation matters.
- Keep all connections dry. Never plug in with wet hands or in a damp environment.
Legal Disclaimer
⚠️ Important: This guide is for informational purposes only. Transfer switch wiring must be performed by a licensed electrician in compliance with NEC electrical safety standards. Improper wiring creates fire and electrocution hazards.
Step 1: Unboxing and Initial Charging
What's in the Box
The HomePower 3000 ships with the main unit, an AC charging cable, a DC car charging cable, and a user guide. Inspect the unit on arrival , check the display screen, port covers, and handle before plugging in.
First Charge
Charge to 100% via AC wall outlet before first use. Published specifications confirm the unit reaches full charge in approximately 1.7 hours via AC wall input. The display shows remaining charge percentage alongside real-time input and output wattage , you'll know it's fully charged when the display reads 100% and input wattage drops to zero.
Don't skip this step. A full initial charge conditions the LiFePO4 (lithium ferro-phosphate) battery and establishes the baseline for ZeroDrain performance. Spec data indicates this battery chemistry supports up to 10 years of use before significant degradation.
What HomePower 3000 Can Run During an Outage (3,072Wh)
🧊
Mini Fridge
~51 hrs
60W avg
💡
LED Lights (10x)
~200 hrs
15W total
📡
Starlink + Router
~41 hrs
75W avg
🌀
Ceiling Fan
~154 hrs
20W avg
☕
Coffee Maker
~6 hrs
500W avg
Runtime calculations based on 3,072Wh capacity at ~85% efficiency. Mixed load results will vary.
Step 2: Positioning the Unit Indoors
Where you place the HomePower 3000 affects both convenience during an outage and long-term battery health in standby mode. Place the unit on a flat, stable surface with adequate airflow on all sides. A garage, utility room, or area near your electrical panel works well.
Keep it away from direct sunlight and humid areas like laundry rooms or bathrooms. The unit weighs 62 lbs (28.1 kg) and measures 17.1 x 11.3 x 16.1 inches, so factor in clearance for the charging cables.
ZeroDrain technology is a key advantage for standby use. Published figures for this technology confirm the unit retains 95% of its charge after 12 months of storage. That means placement for long-term readiness is practical: you can set it up once and rely on it being ready when an outage hits.
Step 3: Choosing Your Recharging Strategy
The HomePower 3000 supports five recharging methods. The right choice depends on how you plan to use the unit and what resources you have available during an extended outage.
AC wall charging is the fastest and most convenient for pre-outage top-ups. Solar works well for multi-day outages when grid power is unavailable. The hybrid approach (AC plus solar simultaneously) delivers the fastest possible recharge for urgent situations.
Step 4: Connecting Devices Directly
Direct Plug-In Method (No Electrician Needed)
For most users, direct plug-in is the fastest way to get up and running. The HomePower 3000 supports a wide range of devices across four port types.
- AC outlets (4x, 120V): Refrigerators, fans, lights, CPAP machines, coffee makers. Combined max: 3,600W continuous, 7,200W surge.
- USB-C PD (100W): Laptops, tablets, and phones that support fast charging.
- USB-A (5V/2.4A): Standard phone chargers, small accessories.
- DC car port (12V): 12V coolers, vehicle accessories, DC-powered fans.
You'll know the unit is working correctly when the output wattage on the display increases to match your connected load. The display updates in real time , connect a 150W fridge and you'll see that figure appear within seconds.
Step 5: Transfer Switch Setup for Whole-Home Coverage
What Is a Transfer Switch?
A transfer switch connects your power station to your home's electrical circuits. Instead of plugging devices in one by one, you flip a single switch and selected circuits across your home draw power from the HomePower 3000 automatically.
The Jackery Manual Transfer Switch (sold separately, approximately $399) supports up to 6 circuits and is designed to work directly with the HomePower 3000's AC output. Visit Jackery's official product page for current compatibility details.
Manual Transfer Switch Installation Steps
The wiring portion of this installation must be done by a licensed electrician. Here's what the process looks like from start to finish.
Jackery Manual Transfer Switch: How It Works
①
Connect Power Station
Plug HomePower 3000 into Transfer Switch input port via included AC cable
②
Wire Selected Circuits
Licensed electrician connects critical circuits (fridge, lights, CPAP) to transfer switch
③
Flip During Outage
When grid goes down: switch from “Utility” to “Generator” position
④
Power Flows
HomePower 3000's 3,600W output runs your selected circuits instantly
Always hire a licensed electrician for transfer switch wiring. Jackery Manual Transfer Switch sold separately (~$399).
What Circuits Can the HomePower 3000 Support?
The 3,600W continuous AC output handles the essential circuits most households rely on during an outage. A typical load of fridge (150W), lights (100W), router plus Starlink (75W), CPAP (30W), and phone charging (50W) totals around 405W sustained. Runtime calculations at that combined load show approximately 6 to 7 hours continuous , enough to cover most overnight outages.
Higher-draw appliances like window AC units (900 to 1,440W) reduce runtime significantly. At 1,200W, runtime calculates to approximately 2 hours. The 7,200W surge capacity handles compressor startup without issue.
Comparing Jackery Home Backup Models?
See how the HomePower 3000 stacks up against every current Jackery home backup option.
Step 6: Solar Panel Setup for Extended Outages
Compatible Panels
Two Jackery SolarSaga 200W panels represent the recommended solar configuration for the HomePower 3000. Connect both panels to the solar input port using the MC4-compatible adapter included with the panels. The unit's MPPT (Maximum Power Point Tracking) controller optimizes the solar input automatically , no manual adjustment needed.
During setup, tilt the panels at 30 to 45 degrees facing south for maximum exposure. Even partial sun yields meaningful input. Owner data consistently reports useful recharge progress during partly cloudy conditions, though full sun is required to hit the rated input rates.
Expected Solar Recharge Times
With two SolarSaga 200W panels under full sun conditions, the combined 400W solar input brings the 3,072Wh unit from 0 to 100% in approximately 7 to 8 hours. For a two-day outage with 6+ hours of daily sun, that's a complete recharge cycle each day , enough to sustain essential load around the clock.
New to Solar Setup?
Our complete home backup planning guide covers solar panel sizing, load calculations, and setup strategy.
Troubleshooting Common Issues
Unit Won't Power On
Check the charge level on the display first. If the screen is blank, the unit may have discharged below the activation threshold. Connect the AC charging cable and wait 10 minutes before pressing the power button again. You'll know it's charging when the display activates and shows an incoming wattage reading.
Transfer Switch Not Switching
If the switch doesn't transfer correctly during an outage, verify that the HomePower 3000 is powered on and outputting AC before flipping the transfer switch. If the problem persists after confirming the unit is running, contact your electrician to inspect the wiring connections. Do not attempt to inspect the panel wiring yourself.
Display Shows Error Code
Error codes indicate a protection system has activated, usually due to overload, overtemperature, or short circuit detection. Disconnect all loads, allow the unit to cool for 5 minutes, and restart. If the error reappears with minimal load connected, refer to the user manual's troubleshooting section or contact Jackery support directly.
Conclusion
The Jackery HomePower 3000 jackery homepower 3000 setup process breaks down into six clear stages: unboxing and charging, indoor placement, recharging strategy, direct device connections, transfer switch wiring, and solar integration. Direct plug-in setup takes around 30 minutes. Adding whole-home circuit coverage via a manual transfer switch requires a licensed electrician and a few hours of scheduled work, but the result is a reliable home backup system with 3,072Wh capacity and 3,600W output ready on demand.
Performance data for the HomePower 3000 consistently points to the same strengths: the 1.7-hour AC recharge is the fastest in its class, ZeroDrain technology makes it practical for long-term standby use, and the 10-year LiFePO4 battery lifespan delivers genuine long-term value at $2,499. Explore other home backup options in the full Jackery new lineup guide for 2026.
Jackery HomePower 3000
$2,499
Best Jackery for whole-home backup
Price verified April 2026 , Free shipping available
Frequently Asked Questions
Do I need an electrician to set up the Jackery HomePower 3000?
For direct plug-in use, no electrician is needed. Plug the unit in, charge it to 100%, and connect your devices directly to the AC outlets, USB ports, or DC car port. For Jackery transfer switch installation to your home's circuit panel, a licensed electrician is required. NEC codes mandate this for safety and legal compliance. Skipping the electrician for panel wiring creates fire and electrocution hazards.
How long does the HomePower 3000 power a fridge during an outage?
Runtime calculations based on the 3,072Wh capacity and a typical 60W mini-fridge draw show approximately 51 hours. A standard full-size refrigerator drawing 150W yields around 17 hours continuous. In practice, the HomePower 3000 can power a mini-fridge through a 2-day outage with capacity to spare for lights, phone charging, and internet. Mixed loads reduce these figures proportionally.
Can the HomePower 3000 run a window air conditioner?
Performance data indicates the unit's 3,600W AC output handles most window air conditioners, which typically draw 900 to 1,440W during operation. At a 1,200W load, runtime calculates to approximately 2 hours. The 7,200W surge capacity handles compressor startup reliably. For overnight cooling, pair it with solar recharging to extend effective runtime through a multi-day outage.
What transfer switch does Jackery recommend for the HomePower 3000?
Jackery sells a compatible Manual Transfer Switch separately for approximately $399. It supports up to 6 circuits and is designed to connect directly to the HomePower 3000's AC output. The jackery smart transfer switch and jackery manual transfer switch are both available options depending on your preference for manual or semi-automatic switching during an outage. Your electrician can advise on which configuration suits your panel layout.
How often should I top up the HomePower 3000 during standby?
Published data for ZeroDrain technology confirms the unit retains 95% of its charge after 12 months of storage. A single full recharge once per year is sufficient for standby home backup use. This makes the HomePower 3000 practical for long-term readiness: charge it fully after purchase, position it near your electrical panel, and it stays ready without ongoing maintenance.
Originally published: April 15, 2026