
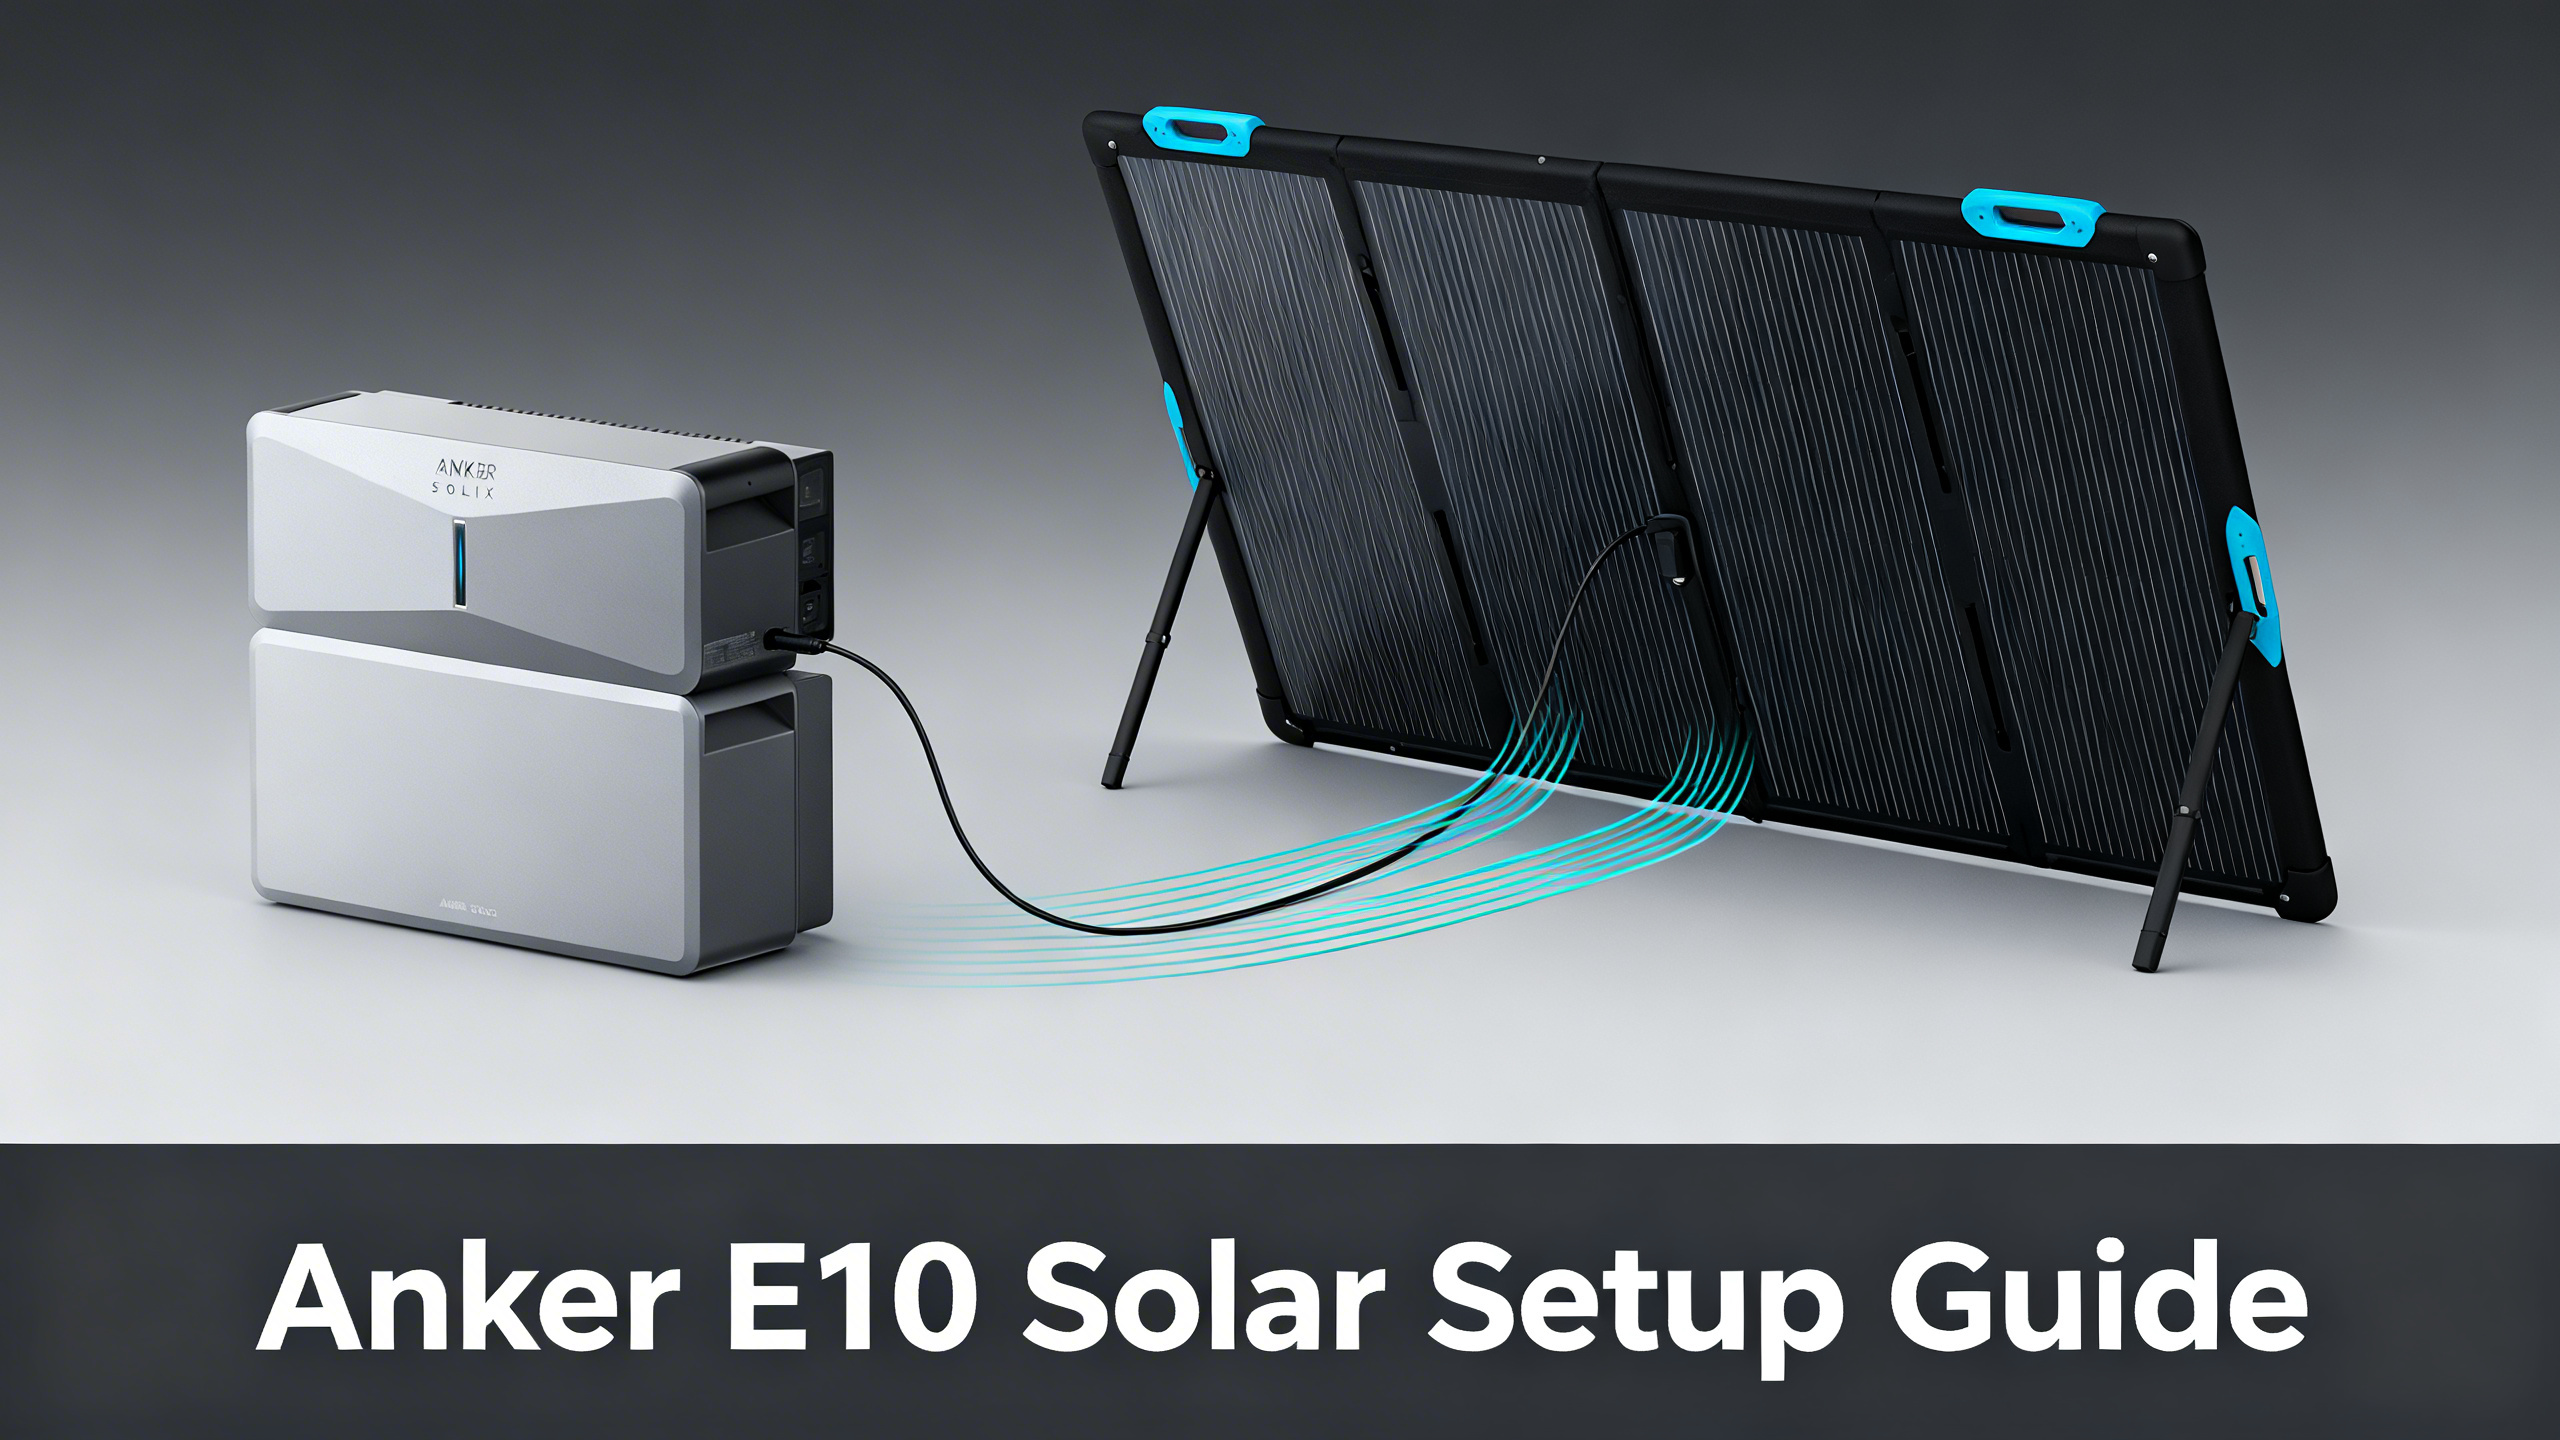
The Anker SOLIX E10's solar input capacity is one of its most underutilized advantages. Many buyers connect one or two portable panels and stop there, leaving significant recharge speed and energy independence on the table. Published specifications confirm the system accepts up to 3,000W of solar input per power module, which changes the panel math entirely compared to conventional portable power stations.
This guide breaks down every viable E10 solar configuration: from the basic two-panel starter included in the bundle to the maximum rigid panel array that approaches the per-module cap. Each scenario includes panel cost estimates and charge time data so you can match your setup to your actual backup goals. Whether you own your home or rent, there is a configuration here that works.

⚡ Best Starter Bundle
Anker SOLIX E10 + 2× 400W Solar Panel Bundle
$5,099
- E10 base unit (Power Module + Battery) included
- 2× 400W portable panels ready to charge immediately
- UL9540 & 9540A certified whole-home system
Understanding the E10's Solar Input System
Before selecting panels, understanding the E10's published solar architecture matters. The system is built around a modular design where each power module accepts up to 3,000W of solar input independently. Stack two or three modules, and the aggregate theoretical input scales accordingly. For a full breakdown of the E10's inverter and battery capacity, the E10 system review provides the complete technical breakdown.
The solar connector is MC4 standard, which means both the 400W portable panels and the 440W rigid panels connect directly. Portable panels typically include an MC4 to XT60 adapter cable in the box. Rigid panels connect via MC4 combiner box when stringing multiple units together. Before diving into panel configurations, the full Anker SOLIX brand review covers the complete ecosystem context you need.

Key Solar Input Specs
| Specification | E10 (1 Module) | E10 (3 Modules) |
|---|---|---|
| Max Solar Input | 3,000W | 9,000W |
| Solar Connector | MC4 | MC4 (per module) |
| Charge 0–80% (max solar) | ~1.5 hrs | ~0.5 hrs (theoretical) |
| Compatible Panel Types | Portable (400W) and Rigid (440W) | Same |
| Certification | UL9540 & 9540A | UL9540 & 9540A |
Anker SOLIX E10: Solar Input Specifications
3,000W
Max Solar Input (per module)
9,000W
Max Solar (3 modules stacked)
~1.5 hrs
0–80% via max solar
MC4
Solar connector type
Spec data based on published Anker SOLIX E10 specifications. Certified UL9540 & 9540A.
Step 1: Confirm Your E10 Configuration Before Adding Solar
The E10's battery count directly affects how much solar energy the system can store per cycle. A Power Module paired with one Battery module gives you a specific usable capacity. Adding a second Battery module increases that ceiling considerably, which means a larger solar array pays off more quickly in terms of time-to-full-charge. The official E10 product page documents exact capacity figures for each battery configuration.
Power Module + 1 Battery vs Power Module + 2 Batteries
With a single battery module, a moderate 4-panel rigid setup can realistically achieve full recharge within a good solar day. Adding a second battery module roughly doubles the stored capacity, which means more panels are needed to maintain the same recharge speed. The trade-off is clear: more storage requires proportionally more solar input to avoid multi-day recharge cycles during heavy use.
The E10 is also certified to UL9540A energy storage certification standards, which matters if you are planning a permanent installation. This certification affects which installer options are available in your area and whether the system qualifies for utility incentives in some regions.
Power Dock vs Smart Inlet Box: Which You Need for Solar
This is the most commonly misunderstood part of the E10 solar setup. The Smart Inlet Box handles portable generator input via an AC bypass route, and it works with some solar configurations through that AC path. The Power Dock, by contrast, provides permanent wiring into your electrical panel and is required for automatic grid-to-battery switchover. If you are planning a fixed rigid panel array on your roof or ground mount, the Power Dock is the correct integration point for that level of installation.
💡 Pro Tip: Confirm your accessory configuration before purchasing additional panels. The Power Dock ($1,999) adds automatic switchover capability that meaningfully changes how your solar harvest integrates with the home grid.
Step 2: Choose Between Portable and Rigid Panels
The choice between the 400W portable panels and the 440W rigid panels shapes everything downstream: installation complexity, daily energy yield, recharge speed, and long-term flexibility. Neither is universally better. The right answer depends on whether you own your home and how permanent you want the installation to be.

Portable Panels (400W)
The 400W portable panels fold flat for storage and require zero installation. You position them in direct sunlight, connect via the included MC4 cable, and the E10 begins drawing solar input immediately. The flexibility is genuine: they can be angled manually throughout the day, moved between locations, and stored inside during severe weather. The practical limit for a single-module E10 is seven to eight portable panels before approaching the 3,000W input cap.
The limitation is equally real. Portable panels rely on manual repositioning to track the sun, and their foldable monocrystalline cells are efficient but cannot match the daily yield of optimally mounted rigid panels over a full year. For renters or anyone starting out, they remain the correct entry point.
440W Rigid Panels
The 440W rigid panels deliver more wattage per panel and are designed for permanent rooftop or ground-mount positioning. At a fixed optimal angle for your latitude, they outperform portable panels in total daily energy yield. Six to seven panels per module brings total input to 2,640–3,080W, approaching or reaching the per-module cap. A comparison of all available Anker bundles is available in the complete solar kits overview if you want to evaluate pre-packaged options.
The trade-off is installation complexity. Rigid panels require mounting hardware and professional installation is strongly recommended for rooftop work. They are not a weekend DIY project for most homeowners. But for those who commit to it, the energy yield data is consistently favorable compared to portable setups of equivalent panel count.
Mixed Approach
A mixed configuration starts with the portable panels included in the E10 bundle, then expands with rigid panels added via an MC4 combiner box. This is a practical path for homeowners who want to begin generating solar energy immediately and scale up after the installation is planned and permitted. Both panel types share the same MC4 connector standard, so the hardware integration is straightforward.
Choose 440W Rigid Panels if…
- You own your home and have roof access
- You want maximum daily energy yield
- You are pairing with the Power Dock for automatic grid switchover
- You need to reach the 3,000W per-module cap
Choose 400W Portable Panels if…
- You rent or cannot mount panels permanently
- You want flexibility to reposition seasonally
- You are starting out and plan to expand later
- Budget is the primary concern right now
Best Panel Configurations by Use Case
Spec-based calculations across all viable E10 solar configurations point to three practical tiers. The right tier depends on whether you prioritize low upfront cost, balanced recharge performance, or maximum energy independence. Each configuration below represents a real scenario with concrete numbers drawn from published panel ratings and E10 input specifications.
Configuration A: Starter Setup (Renters or Trial)
Two 400W portable panels deliver 800W of combined solar input. Charge time calculations based on rated capacity show an estimated 5 to 6 hours from 0 to 80% under peak sun conditions. This configuration is included in the E10 + 2× 400W bundle at $5,099, which means no additional panel cost at the outset. It works well for users who want immediate solar capability without making a permanent installation commitment.
Configuration B: Standard Homeowner (Most Popular)
Four 440W rigid panels produce 1,760W of solar input. Spec-based charge time data indicates approximately 2.5 hours from 0 to 80% under good conditions. Panel cost is $1,998 when purchasing two 2-panel bundles of the 440W rigid at $999 each. For a detailed watt-per-dollar breakdown of every Anker panel available today, the panel comparison guide ranks all options from the 100W PS100 to the 440W rigid. This configuration hits the efficiency sweet spot for most single-module E10 setups: meaningful recharge speed without pushing into diminishing returns on installation complexity.
Configuration C: Maximum Efficiency (Large Homes or Multi-Module)
Six to eight 440W rigid panels approach the 3,000W per-module input cap. At 2,640W (6 panels) to 3,080W+ (8 panels in parallel), spec-based recharge calculations show 0 to 80% in approximately 1.5 to 1.8 hours under peak sun. Panel cost ranges from $2,997 (6 panels across three 2-panel bundles) to $3,996 (8 panels). This tier makes the most sense for large homes with high daily energy consumption or for users running three stacked E10 modules who need proportionally more solar input.
E10 Solar Configuration Options at a Glance
Starter
2× 400W Portable
Total input: 800W
Charge time (0–80%): ~5–6 hrs
Best for: Renters, temporary setups
Bundle price: $5,099
Recommended
4× 440W Rigid Panels
Total input: 1,760W
Charge time (0–80%): ~2.5 hrs
Best for: Most homeowners
Panel cost: $1,998
Maximum
6–8× 440W Rigid Panels
Total input: 2,640–3,000W
Charge time (0–80%): ~1.5 hrs
Best for: Large homes, 3+ modules
Panel cost: $2,997–$3,996

Smart Inlet Box vs Power Dock for Solar Integration

The accessory you pair with the E10 determines how solar input integrates with your home's power flow. This distinction is critical for anyone planning more than a two-panel portable setup.
Smart Inlet Box ($399): Generator + Solar via AC Input
The Smart Inlet Box routes portable generator input into the E10 via an AC bypass path. It does not require electrical panel work, which keeps installation simpler and avoids the need for a licensed electrician in most jurisdictions. Solar input through the Smart Inlet Box runs via the AC pathway, which limits real-time solar input management compared to the Power Dock's direct integration. For renters or temporary setups prioritizing portability, this is the appropriate accessory.
Power Dock ($1,999): Full Grid Integration for Permanent Solar
The Power Dock requires permanent wiring into your electrical panel, which means a licensed electrician is part of the installation process. In return, it enables automatic whole-home switchover when grid power fails and provides the stable, direct integration point that a rigid panel array needs to perform at maximum efficiency. For any homeowner planning a 4-panel or larger fixed installation, the Power Dock is the correct choice. The additional upfront cost reflects the level of integration it provides.
⚠️ Important: If you are committed to a rooftop or ground-mount installation, the dedicated guide on rigid panels for E10 covers mounting, wiring, and code compliance in detail.
Step-by-Step Solar Connection Guide

The physical connection process is straightforward once the panel type and accessory configuration are decided. The steps below apply to both portable and rigid panel setups, with notes where the process diverges.
Step 1: Locate Your E10's Solar Input Port
The solar input port is the MC4 female connector on the power module. Refer to your E10 setup documentation to confirm the exact location on your unit variant. The port is typically accessible on the rear or side panel of the module.
Step 2: Connect Portable Panels via MC4 to XT60 Cable
For the 400W portable panels, use the included MC4 to XT60 adapter cable. Align the connector, push firmly until you hear a click, and verify a secure fit with a gentle tug. No tools are required. Position the panels at an angle that faces the sun directly (45 degrees is a common starting point for mid-latitudes).
Step 3: Connect Rigid Panels via MC4 Combiner Box
For multiple 440W rigid panels, wire them in parallel using an MC4 combiner box. Parallel wiring keeps voltage within the E10's acceptable input range while allowing current to scale with each panel added. Series wiring is not recommended for this application because voltage accumulates quickly and can exceed safe input thresholds. Confirm all MC4 connections are fully seated before activating the system.
Step 4: Verify Connection via the Anker SOLIX App
Connect to the E10 via Bluetooth or Wi-Fi and open the Anker SOLIX app. The solar input wattage should appear in real time on the dashboard within 30 to 60 seconds of the panels receiving direct sunlight. If the reading is zero or erratic, check that the MC4 connections are fully seated and that no shadow is crossing the panels.
Need the full E10 ecosystem context?
See how the E10 compares across home backup scenarios, generator pairing, and load management.

Which Solar Configuration Matches Your Backup Needs?
For a broader look at how the E10 fits within the full range of Anker SOLIX home backup solutions, including generator pairing and load management, that guide covers everything. The table below summarizes the key decision matrix across all four practical configurations.
| Configuration | Panel Cost | Est. 0–80% Charge | Best For |
|---|---|---|---|
| 2× 400W Portable | Included in $5,099 bundle | ~5–6 hrs | Renters, starter setup |
| 4× 440W Rigid | $1,998 | ~2.5 hrs | Most homeowners |
| 6× 440W Rigid | $2,997 | ~1.8 hrs | Large homes, grid-independent goal |
| 8× 440W Rigid (max) | $3,996 | ~1.5 hrs | Maximum daily yield, 3-module E10 |
FAQ: Anker SOLIX E10 Solar Setup
What is the maximum solar input for the Anker SOLIX E10?
Published specifications confirm the E10 accepts up to 3,000W of solar input per power module. With three modules stacked, the theoretical aggregate input climbs significantly. For practical single-module setups, 6 to 8 units of the 440W rigid panel are needed to approach this limit.
Can I use third-party solar panels with the Anker SOLIX E10?
The E10 uses a standard MC4 solar connector, which means third-party panels with MC4 outputs are technically compatible from a hardware standpoint. However, Anker's published warranty and UL9540A certification apply to configurations using official Anker SOLIX panels. Using third-party panels may affect warranty coverage.
What is the difference between the 400W portable panel and the 440W rigid panel for the E10?
The 400W portable panel is foldable and requires no permanent installation. The 440W rigid panel delivers 40W more per unit, is designed for rooftop or ground-mount installation, and performs better in fixed, optimally angled positions. Spec analysis shows the rigid panel delivers a higher daily energy yield for permanent setups.
Do I need a Power Dock to use solar with the E10?
No. The E10's solar input port accepts panels directly without the Power Dock. The Power Dock is required if you want full automatic grid switchover and permanent panel wiring through your electrical panel. For portable panel setups, a direct MC4 connection to the module is all that is needed.
Can I mix 400W portable and 440W rigid panels on the same E10?
From a technical standpoint, both use MC4 connectors and can be combined using a solar combiner box. However, mixing panel types in series is not recommended because mismatched Voc values can reduce MPPT efficiency. Parallel wiring of same-voltage panels, or using them on separate inputs, is the approach that data supports for maintaining maximum input performance.
How long does it take to charge the E10 fully from solar?
Charge time depends on panel configuration and sunlight conditions. Spec-based calculations show: 2 portable 400W panels (800W total) produce an estimated 5 to 6 hour 0-to-80% charge under peak sun. With 6 rigid 440W panels (2,640W), that figure drops to approximately 1.5 to 2 hours. These are ideal-condition estimates based on published capacity and rated solar input figures.
Conclusion: Getting the Most from Your E10 Solar Investment
The data consistently points to the 4× 440W rigid configuration as the efficiency sweet spot for single-module E10 setups. At $1,998 in panel cost and an estimated 2.5-hour 0-to-80% charge under good sun, it balances recharge performance against installation complexity in a way that works for most homeowners. The E10 + 2× 400W portable bundle at $5,099 remains the correct starting point for anyone who cannot or does not want to commit to a permanent installation.
For serious whole-home backup coverage, the E10 + Power Dock + 2× 405W Rigid Panels bundle at $8,798 delivers the most complete permanent installation configuration Anker offers in a single package. The Power Dock's automatic switchover capability and the stable integration it provides for a rigid panel array make it the recommended permanent home installation for users who want maximum backup coverage without managing multiple separate components.
Whatever your starting point, the modular nature of the E10's design means you are not locked into your initial configuration. Additional battery modules, extra panels, and Power Dock integration can all be added as your needs evolve.
E10 + Power Dock + 2× 405W Rigid Panels
$8,798
Best permanent solar + grid-backup configuration
Price verified April 2026 · Free shipping available
Originally published: April 6, 2026