
Staring at a tangle of cables and wondering which port goes where is one of the most common first-time experiences with EcoFlow solar charging. The good news: the connection process is straightforward once you understand two things. Every EcoFlow portable solar panel ships with the exact cable you need, and every EcoFlow station has a built-in charge controller. No extra hardware required.
This guide walks you through the complete process in six clear steps, from checking your station’s input specs to verifying the connection is live. You’ll also find a panel compatibility table, a troubleshooting decision tree, and answers to the eight most common questions EcoFlow owners ask. For exact charge times once connected, use our ecoflow solar charge time calculator to find your specific model-and-panel combination.

EcoFlow 110W Portable Solar Panel
$169.00 $399.00
- Up to 23% conversion rate
- IP68 waterproof; self-supporting kickstand
- XT60 charging cable included
What You’ll Need: Equipment and Cables
Required Equipment
The core setup requires three things: an EcoFlow power station (any RIVER or DELTA model), an EcoFlow portable solar panel, and the MC4 to XT60 charging cable. That last item ships inside the box with every EcoFlow panel, so if you’re using EcoFlow hardware throughout, you won’t need to buy any cables separately.
Here’s a quick reference for what to gather before you start:

Optional but Helpful
A 3-meter solar extension cable lets your station stay in the shade while the panel points at the sun. Owner data consistently shows this arrangement improves real-world input by keeping the station cool during long charging sessions. A multimeter is useful if you’re troubleshooting voltage on a third-party panel. Zip ties and an angle guide clip round out the kit for a tidy permanent setup.
Estimated Time and Difficulty
The connection process takes 10 to 15 minutes on a first attempt, including setup and verification. Difficulty level: beginner. No technical background is required. If you can plug in a garden hose fitting until it clicks, you can complete this process without issue.
Understanding EcoFlow Solar Connections
Before touching a cable, it helps to know what you’re connecting. EcoFlow panels output power through MC4 connectors, the industry-standard locking plugs used on most solar equipment. Your EcoFlow station accepts power through its XT60 Solar Input port, a different connector type. The cable bridging these two is an MC4 to XT60i adapter, and it ships inside the box with your panel.
One thing that surprises many first-time users: you don’t need a separate charge controller. Every EcoFlow power station includes a built-in MPPT (Maximum Power Point Tracking) controller, which is the circuit that optimizes power drawn from the panel moment by moment. MPPT is why EcoFlow stations can accept a wide range of panel wattages and still charge efficiently even under partial cloud cover. According to EcoFlow’s official solar charging documentation, the MPPT system automatically adjusts to current solar conditions without any manual input on your part.
EcoFlow Solar Connector Quick Reference
🔌 Connector Type
MC4 to XT60i adapter cable (included with every EcoFlow panel)
📍 Port Location
Solar Input port (XT60 or DC5525 depending on model: check your station’s label)
⚡ MPPT Controller
Built into every EcoFlow station: no external charge controller needed
🔗 Multiple Panels
Connect in parallel with EcoFlow parallel cable to stay within voltage limits
Step 1: Check Your Station’s Solar Input Specifications
Every EcoFlow model has a maximum solar input wattage and a maximum voltage limit. Exceeding either can trigger a protection cutoff or, in rare cases with third-party panels, cause permanent damage to the MPPT circuit. Before connecting anything, locate these numbers on your unit.
The specs are printed on a label on the bottom or back of the station. They’re also listed in the EcoFlow app under “Device Info.” The two figures to confirm are Max Solar Input (W) and Solar Input Voltage Range (V). Your panel’s rated wattage and open-circuit voltage (Voc) must both fall within these limits.
EcoFlow Solar Input Limits by Model
Note: Actual wattage output depends on sunlight conditions and panel angle. Do not exceed model max voltage to avoid damage.
You’ll know Step 1 is complete when you’ve confirmed your panel’s wattage is at or below the station’s maximum solar input, and its open-circuit voltage (Voc) does not exceed the max voltage listed for your model.
Step 2: Position Your Panel in Direct Sunlight
Place the panel in full sun before connecting any cables. Connecting first, then moving the panel around, risks putting torque on the cable connectors, which can loosen the MC4 lock over time. The better approach is to deploy the panel at the intended location first.
Deploy the kickstand and tilt the panel toward the sun. A 30 to 45-degree angle facing true south covers most scenarios in the continental US. The EcoFlow NextGen 160W and 220W Bifacial panels include an integrated angle guide clip that takes the guesswork out of this step. For regional solar yield data by location, NREL solar irradiance data provides state-by-state peak sun hours that help you set realistic charging expectations.

Success indicator: the panel surface feels warm to the touch within 60 seconds in outdoor sun. That warmth confirms the cells are receiving direct irradiance. If the surface stays cool, check for shadows cast by nearby objects such as trees, vehicles, or roof overhangs.
⚠️ Common mistake: Pointing the panel at the sky rather than the sun. Flat horizontal placement can reduce output by 30 to 50% compared to a properly angled setup. Always tilt toward the sun, not parallel to the ground.
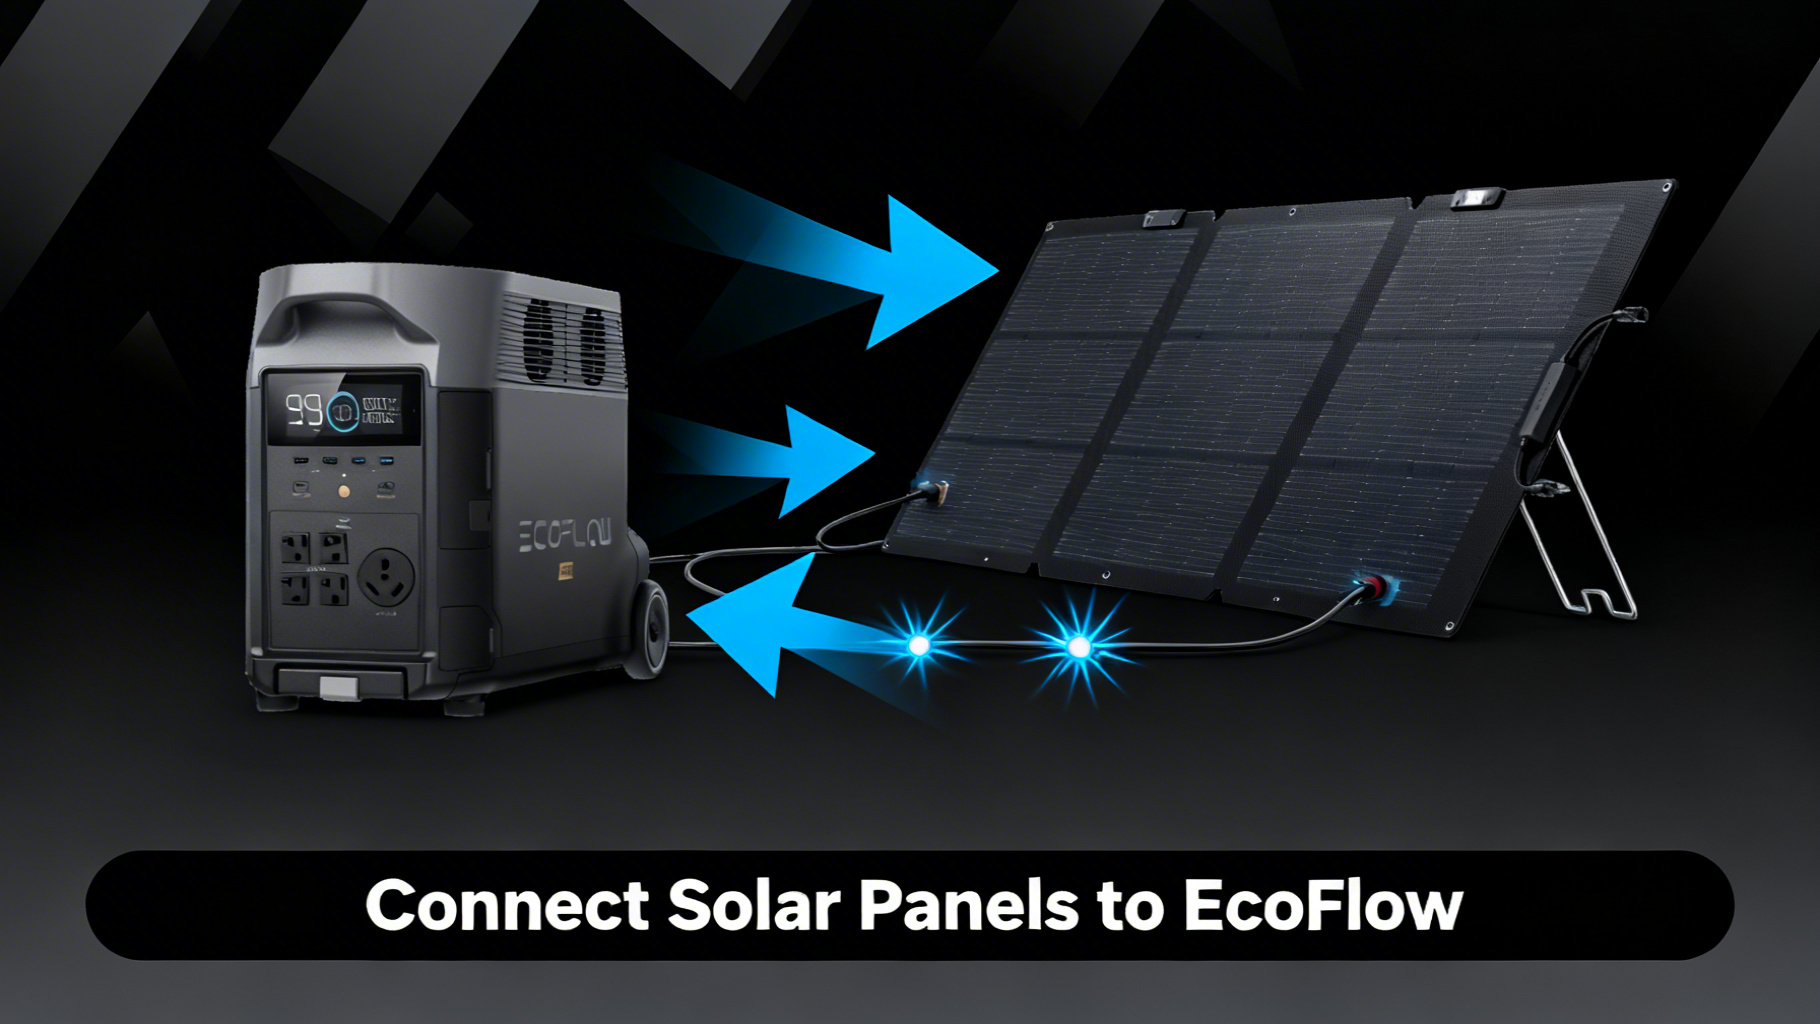
Step 3: Connect the MC4 Cable to Your Solar Panel
Locate the MC4 to XT60 charging cable that came with your panel. One end has two MC4 connectors (typically marked with “+” and “-” or color-coded red and black). The other end has the XT60 barrel plug that goes into the station.
Align each MC4 connector with the matching output port on the panel. The connectors are keyed so the positive and negative can only mate in the correct orientation. Press firmly until you hear and feel a distinct click. There should be no wobble or play in the connection. If the connector slides back out easily, it hasn’t seated fully.
💡 Pro Tip: EcoFlow panels pre-wire the polarity correctly. If you’re using the included cable with an EcoFlow panel, there’s no risk of reverse polarity connection. The physical shape of the MC4 connectors prevents accidental swapping.
Success indicator: both MC4 connectors lock with a firm click, the cable hangs without pulling loose, and neither connector shows any gap between the plug body and the panel’s output port.
Step 4: Plug the XT60 End into Your EcoFlow Station
Locate the Solar Input port on your EcoFlow station. It’s typically labeled “Solar” or “DC In” and uses either an XT60 receptacle or a DC5525 barrel jack depending on your specific model. Check the label next to the port to confirm before inserting.
Insert the XT60 connector firmly into the port. The fit is snug by design. Push until the connector is fully seated, with no visible gap between the plug and the port housing. On most DELTA models, you’ll feel a slight resistance followed by a solid stop when fully inserted.
Enable DC input if no charging indicator appears. Some EcoFlow stations default to DC input disabled. Navigate to the settings menu on the display or within the EcoFlow app, then toggle the DC or Solar Input setting to “On.”
Success indicator: the station display shows a solar charging icon alongside a live wattage reading. Under clear midday sun, spec analysis confirms a 110W panel typically delivers 70 to 95W to the station after MPPT conversion losses. A reading in that range on a sunny day confirms the connection is working correctly.
Step 5: Connecting Multiple Panels (Series vs Parallel)
If your station’s solar input limit allows for more than one panel (see the compatibility table in Step 1), you have two wiring options: series and parallel. For EcoFlow setups, parallel wiring is the recommended approach in almost all cases.
The full breakdown of series vs parallel solar panel wiring is covered in our dedicated guide, but here is what matters for EcoFlow units specifically. In a parallel connection, voltage stays constant while total wattage adds up. In a series connection, voltage multiplies with each added panel. Because EcoFlow stations have strict maximum voltage limits (60V for most DELTA models), stacking panels in series on a higher-voltage station risks exceeding that ceiling and triggering the protection circuit or causing damage.


To wire panels in parallel, use EcoFlow’s optional parallel cable, which joins the positive leads of two panels and the negative leads of two panels before running a single combined cable into the station’s solar input. Each parallel connection keeps the voltage of a single panel while doubling the available current and wattage.
⚠️ Important: Never exceed your station’s rated maximum solar voltage, even temporarily during a connection swap. The DELTA 3 Pro series supports up to 150V, but most mid-range DELTA units cap at 60V. Always verify before adding a second panel.
Which EcoFlow Solar Panel Should You Choose?
The right panel depends on your station model, your available carrying capacity, and how much you’re willing to spend. Here’s a clear breakdown based on verified specs and owner use patterns.
The 110W panel at $169 is the entry-level choice and the best match for RIVER series stations. Its maximum output aligns precisely with the RIVER 3’s 110W solar input limit, so you’re not leaving capacity on the table. It’s also the most portable option in the EcoFlow lineup, with a self-supporting kickstand and IP68 waterproofing for outdoor use.
The NextGen 160W at $209 offers the best watt-per-dollar ratio in the current lineup. Its 25% conversion efficiency (up from 23% on the 110W model) and 30-60 degree adjustable angle bracket make it the practical choice for DELTA 3 owners who want to maximize daily solar harvest with a single panel.
The NextGen 220W Bifacial at $279 adds a unique two-sided design that collects reflected light from the ground surface, delivering up to 25% more energy in the right conditions. It suits DELTA 3 Max and DELTA Pro owners who want maximum output per panel slot. The 400W panel at $599 is the high-end option for DELTA Pro setups requiring fast charging from fewer connection points.

Solar Panel Angle Optimization Guide
Learn how to maximize daily solar harvest with the right tilt and orientation for your location.
Pro Tips to Maximize Solar Input
The connection is only part of the equation. Real-world solar input data shows that panel placement, maintenance habits, and accessory choices can swing daily harvest by 20 to 40% on identical hardware.
Clean the panel surface monthly with a damp cloth. Dust, pollen, and bird droppings accumulate on the ETFE coating and reduce conversion efficiency. Owner reports consistently note a 5 to 15% output recovery after a basic cleaning on panels that had been in outdoor use for 30 or more days.

Keep the station in the shade while the panel charges in full sun. The EcoFlow extension cable (3m, $29.99) makes this separation easy and maintains a clean connection without stressing the included cable. Station batteries charge slightly more efficiently at cooler ambient temperatures, and keeping the unit out of direct heat extends its operational life.
Achieving the optimal solar panel angle is just as important as the connection itself. Aim for 30 to 45 degrees facing true south in most US locations. Adjusting the angle every 2 to 3 hours to track the sun can recover an additional 15 to 25% of daily energy compared to a fixed morning angle. The NextGen 160W and 220W panels include an integrated solar angle guide clip that makes these adjustments a 10-second task.
Avoid even partial shade on any part of the panel during charging. A single shaded cell reduces output across the entire panel, not just that cell. This is a consistent finding in owner feedback across the EcoFlow community and is supported by standard photovoltaic behavior. Cold temperatures actually improve panel efficiency slightly, but reduced daylight hours affect total yield. Our guide on winter solar charging performance explains how to compensate with panel angle adjustments and charging schedule changes.

Troubleshooting: When Your Panel Won’t Charge
Solar Charging Troubleshooting: Quick Diagnosis
⚠️ Zero reading on display
- XT60 cable not fully seated
- Power station in DC off mode
- Panel in shade or indoors
- Connector type mismatch
⚠️ Low wattage (under 50% of rated)
- Clouds or low sun angle
- Panel angle not optimized
- Dirty panel surface
- Partial shading on one cell
✅ Normal operation looks like
- Display shows “SOLAR IN”
- Wattage fluctuates with clouds
- Green charging indicator lit
- Warm (not hot) cable/connector
Problem: Zero reading on display. The most likely cause is an XT60 connector that isn’t fully seated. Disconnect and reinsert with firm, direct pressure. The second most common cause is the DC input being disabled in the station’s settings menu. Check the EcoFlow app or the display’s settings panel and enable the DC or Solar Input option.
Problem: Low wattage reading (under 50% of rated output). Check for partial shade first. Move the panel so no shadow touches any part of its surface. Then verify the tilt angle. On a clear day at midday, spec data for the 110W panel indicates typical real-world output of 70 to 95W. A reading of 20 to 40% of rated wattage on an overcast day is normal. For a full breakdown, see our guide on solar charging in cloudy conditions.
Problem: Fluctuating input. Wattage fluctuation is normal behavior during cloud cover. The MPPT controller continuously adjusts its extraction point as irradiance changes. Steady fluctuation between 20 and 80% of rated output during intermittent clouds requires no corrective action.
Problem: Station does not recognize the panel at all. Verify that DC input is enabled in the settings. Then check the cable connections at both the panel and the station. If using a third-party panel, confirm the panel’s Voc does not exceed the station’s maximum solar input voltage.
Problem: MC4 connector won’t click into place. Check for debris in the connector body. A compressed air can or a dry brush clears most obstructions. Also verify you’re using an EcoFlow MC4 to XT60 cable rather than a standard MC4 extension or a bare MC4 connector, which will not mate correctly with EcoFlow’s XT60 input.
Solar Charging in Cloudy Conditions
Low input reading on an overcast day? Here’s what to expect and how to optimize charging when the sun isn’t cooperating.
Frequently Asked Questions
What cable do I need to connect a solar panel to EcoFlow?
Every EcoFlow portable solar panel includes an MC4 to XT60 charging cable. This cable plugs into the panel’s MC4 output connectors on one end and into the EcoFlow station’s XT60 Solar Input port on the other. No additional adapters are needed when using EcoFlow panels with EcoFlow stations. If you’re using a third-party panel, you’ll need to source an MC4 to XT60 adapter cable separately.
Can I use third-party solar panels with EcoFlow?
Yes, third-party panels are compatible as long as they stay within the station’s maximum solar input voltage and wattage limits. The challenge is cable compatibility: most third-party panels use MC4 connectors, so you’ll need an MC4 to XT60 adapter cable sold separately. Always verify the panel’s open-circuit voltage (Voc) does not exceed the station’s rated maximum. Exceeding the voltage limit can trigger a protection cutoff or damage the MPPT controller.
Does EcoFlow have a built-in charge controller?
Yes. Every EcoFlow power station includes a built-in MPPT (Maximum Power Point Tracking) charge controller. No external controller is required between the panel and the station. The MPPT system automatically optimizes the power drawn from the panel to maximize charging efficiency under varying light conditions. This is one of the key advantages of EcoFlow stations versus older portable power stations that require a separate solar charge controller.
How many solar panels can I connect to my EcoFlow?
The number depends on your station model. The RIVER 3 accepts a maximum of 110W, meaning one 110W panel is the practical ceiling. The DELTA 3 accepts up to 500W (approximately four 110W panels in parallel), and the DELTA Pro accepts up to 1,600W. Always connect multiple panels in parallel to keep voltage within safe limits. Parallel wiring keeps the voltage of a single panel while adding wattage, whereas series wiring raises voltage, which can exceed the station’s rated maximum.
Why is my EcoFlow showing 0W from the solar panel?
The most common cause is the XT60 connector not being fully seated into the station’s Solar Input port. Remove and reinsert with firm, direct pressure. The second most common cause is the DC input being disabled in the station’s settings. Navigate to the charging settings menu on the display or in the EcoFlow app and enable DC or Solar Input. If the connection is secure and DC input is enabled but the reading still shows zero, confirm the panel is in direct sunlight and not in shade.
Can I charge an EcoFlow with solar while using it?
Yes. EcoFlow stations support simultaneous solar charging and power output, a feature commonly called pass-through charging. The station powers connected devices while simultaneously accepting solar input. The net effect on battery charge depends on whether the solar input exceeds the combined draw of your connected devices. This is a standard feature across the entire RIVER and DELTA lineup.
What angle should I position my EcoFlow solar panel?
A 30 to 45-degree tilt angle facing true south (in the northern hemisphere) produces the highest output for most of the day. EcoFlow’s NextGen 160W and 220W Bifacial panels include an integrated solar angle guide clip to help dial in the optimal angle without guesswork. A simple shadow test helps: if the clip casts no shadow in the center of its reference circle, the angle is correct for current sun position.
How long does it take to charge with solar?
Charge time depends on the station capacity, panel wattage, and actual solar conditions. Based on capacity and typical MPPT efficiency, a DELTA 3 (1,024Wh) with a single 220W panel under ideal clear-sky conditions reaches approximately 80% in 6 to 7 hours. Real-world times vary based on cloud cover, panel angle, and ambient temperature. Our dedicated EcoFlow solar charge time calculator covers every model-and-panel combination with detailed estimates.
Conclusion
Connecting a solar panel to an EcoFlow station is a 15-minute process that most first-time users complete without issue once they know what to expect. The included MC4 to XT60 cable handles the hardware translation between panel and station, the built-in MPPT controller handles the electrical optimization, and your only real variables are positioning and panel selection.
For most RIVER owners, the 110W panel covers the full input capacity of the station at $169. DELTA 3 owners get better value from the NextGen 160W at $209, which pushes 25% conversion efficiency and a higher daily harvest per panel. If you’re running a DELTA Pro or building a multi-panel setup, the 220W Bifacial or 400W options close the gap between solar input capacity and practical charge times.
EcoFlow 110W Portable Solar Panel
$169.00
Best entry-level panel for RIVER and DELTA series
Price verified March 2026 — Free shipping available
